
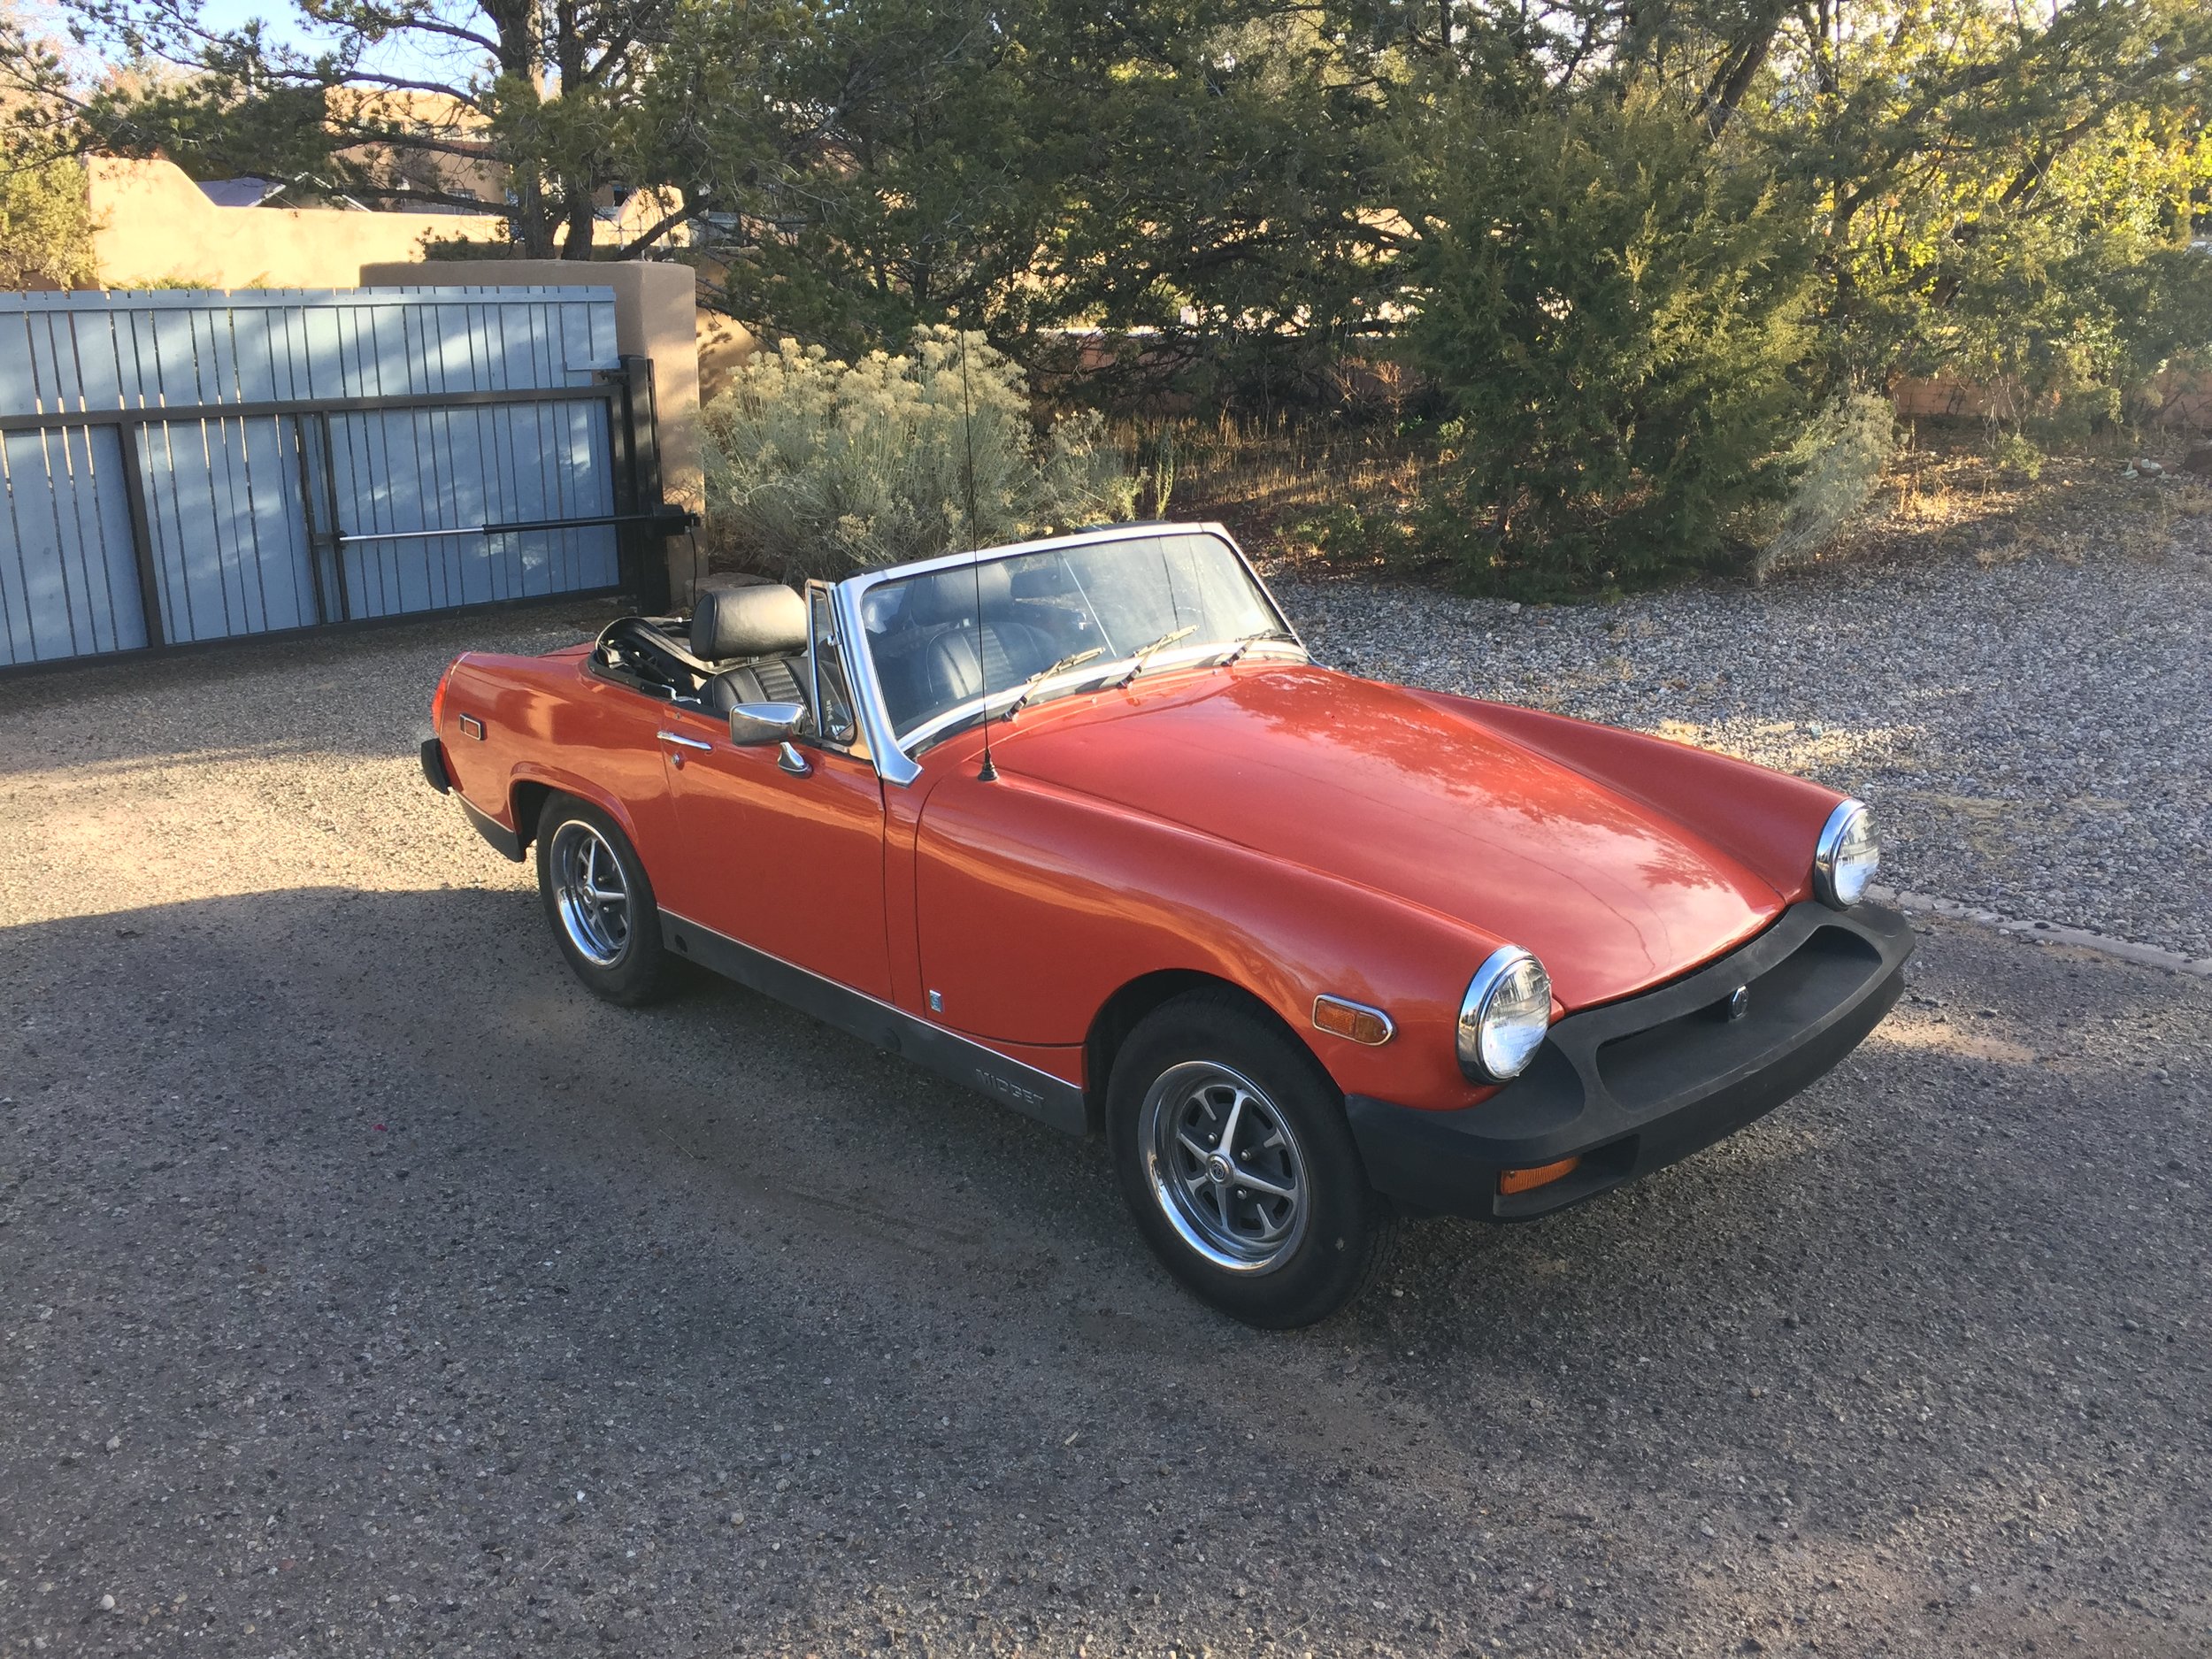
MG Midget Chrome Bumper Conversion

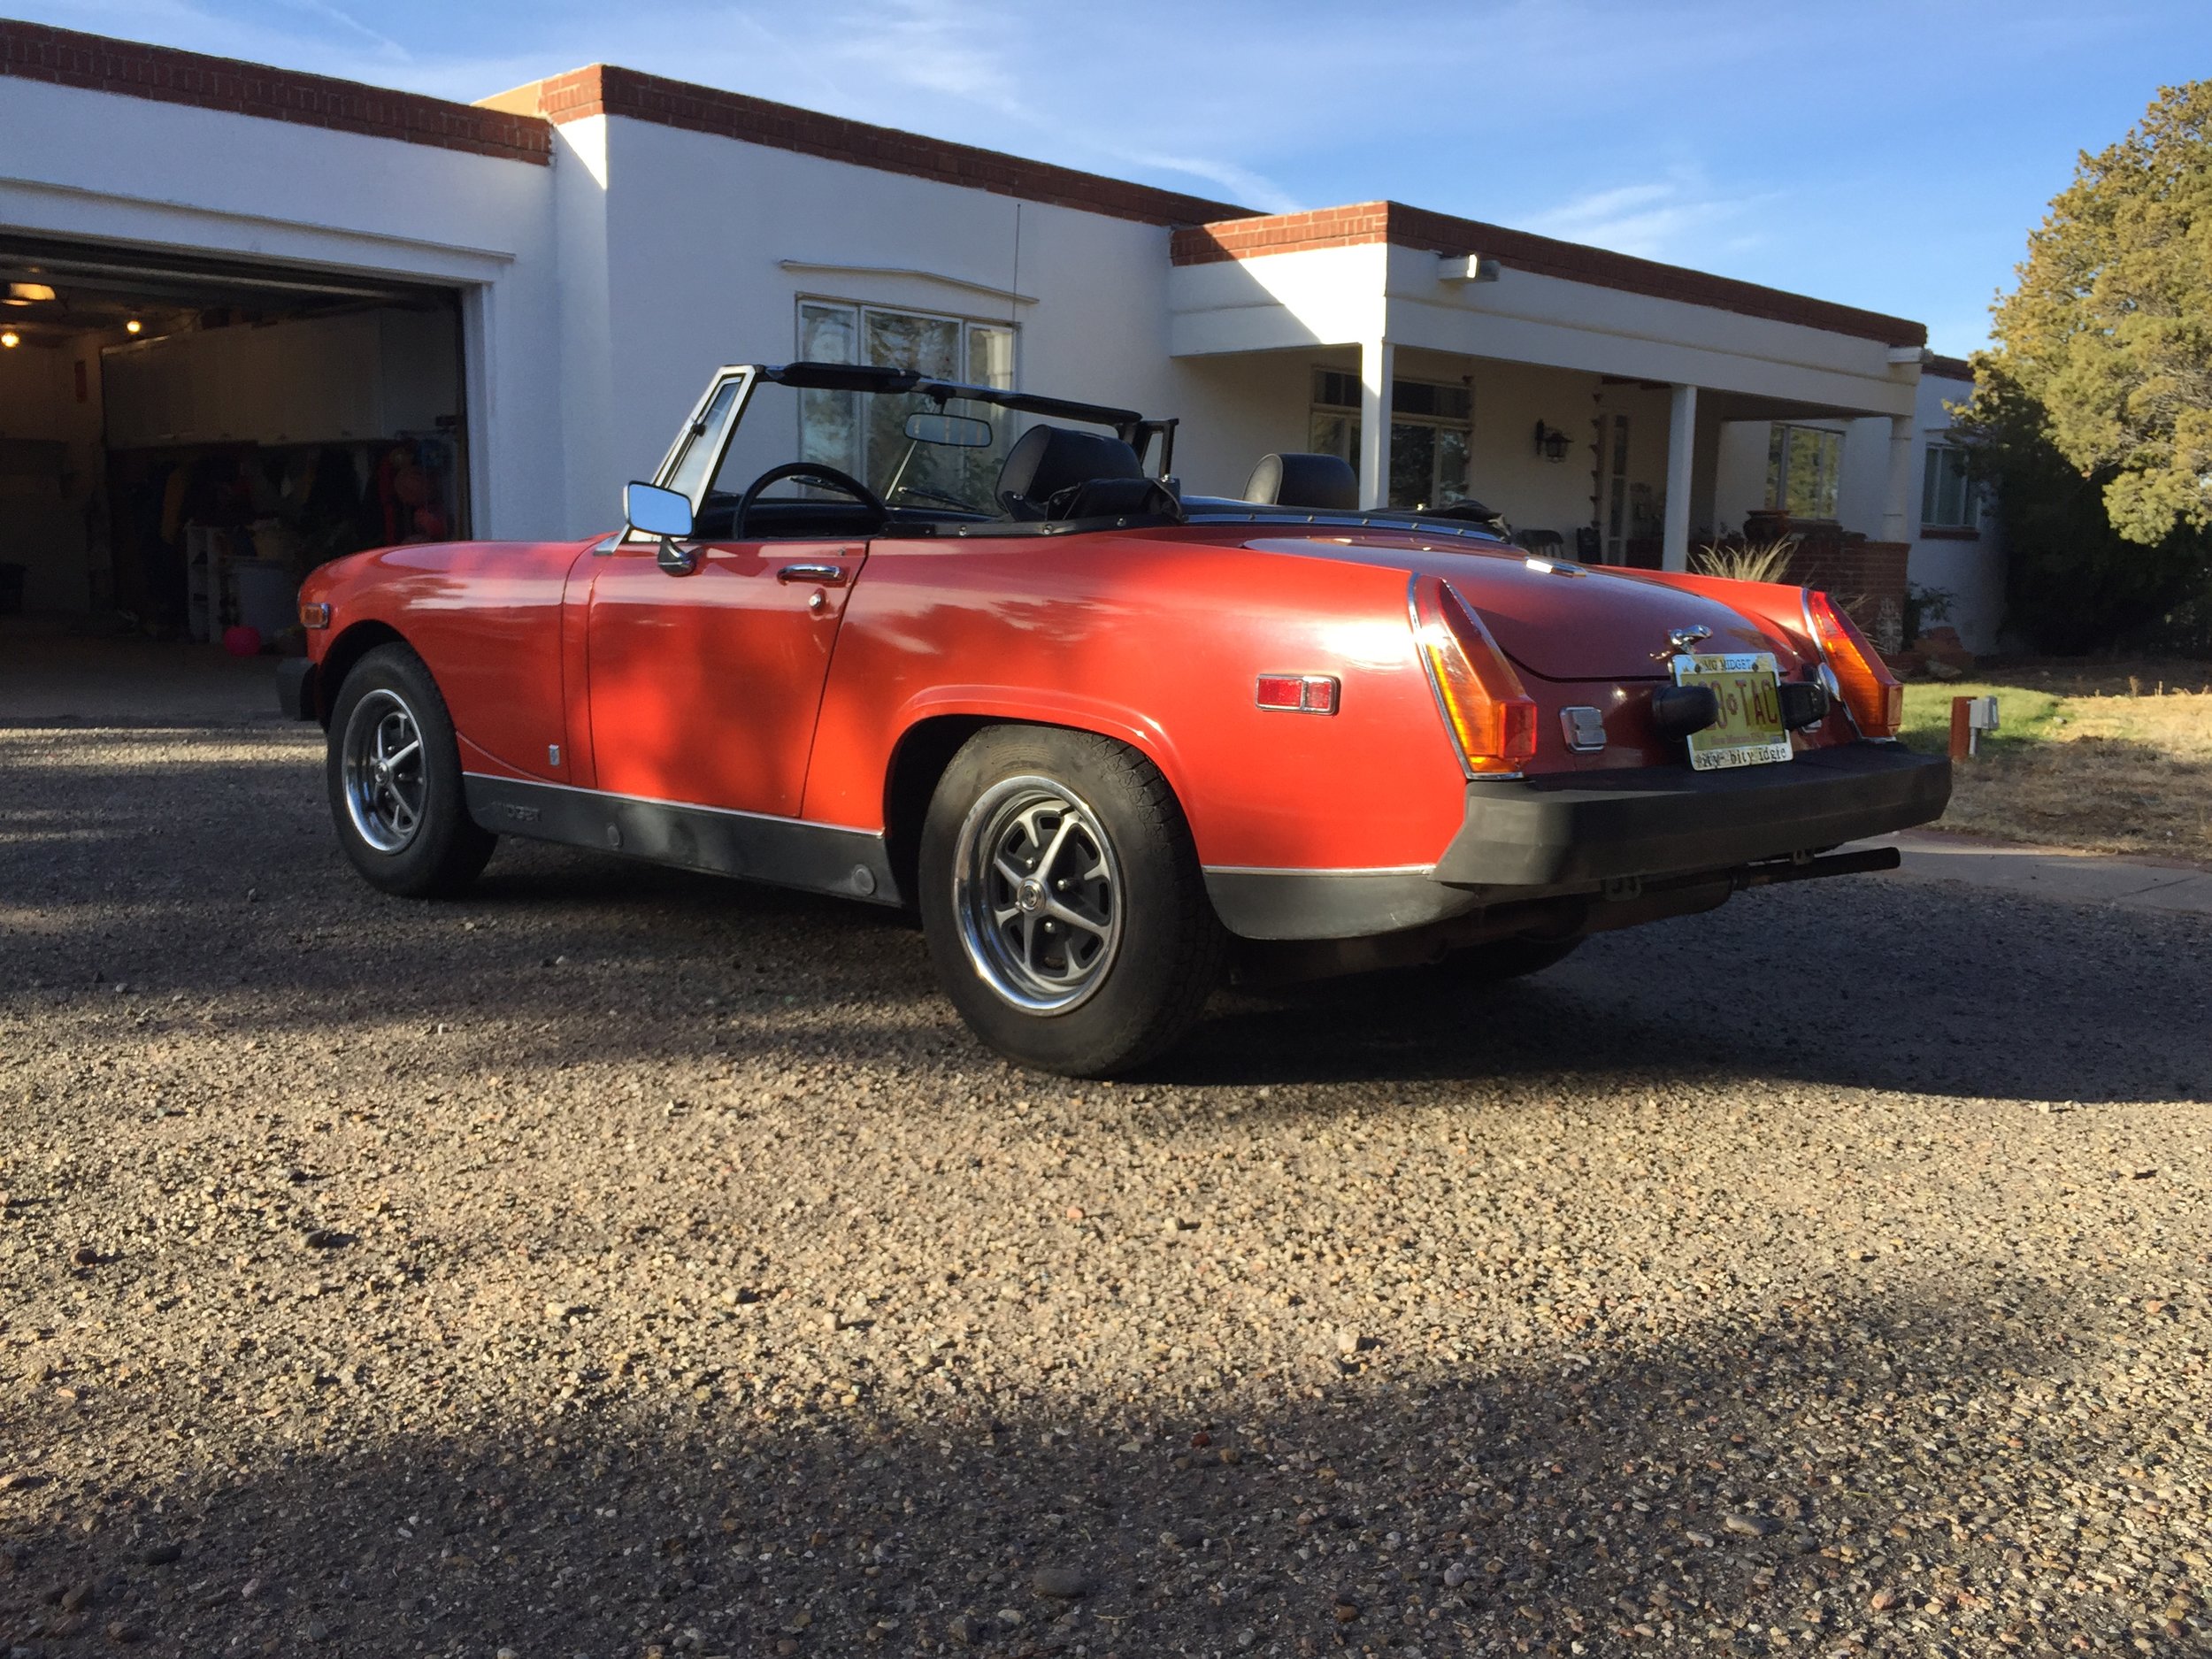
Before and after. Hard to believe it is the same car.
There's an upside to the simple approach that the factory used in adding the rubber bumpers, they retained the original sheet metal underneath. It isn't all sunshine and rainbows, though. The fenders gained some giant holes, they painted the lower sections black, and don't get me started on the back of the car.
I did my internet research (some of the information was even correct!) and decided this project was the place to start. Let's start with some "before" pictures.
The front was definitely the place to start. First the turn signals had to come out. The lenses came right off but it looked like the wires were crimped connections and that means cutting. I held my breath and cut the three wires per side and the light fixtures pulled right out of the bumper. Be aware, this leaves you with no turn signals in front and inoperative signals in the back. No parking lights up front, either! I'll deal with this later.
(Edit: turns out the wires went into bullet connectors. Cutting the wires is not necessary!)
Eight bolts (9/16 wrench) later and the heavy bumper was sitting on the floor. I'm not kidding about heavy! This is a light car and I can't believe how much weight they hung way out front. It only took 15 minutes or so to get to this point. She already looks so much better!
I'd sell the old bumper on eBay but I think the shipping would cost several times what it is worth.
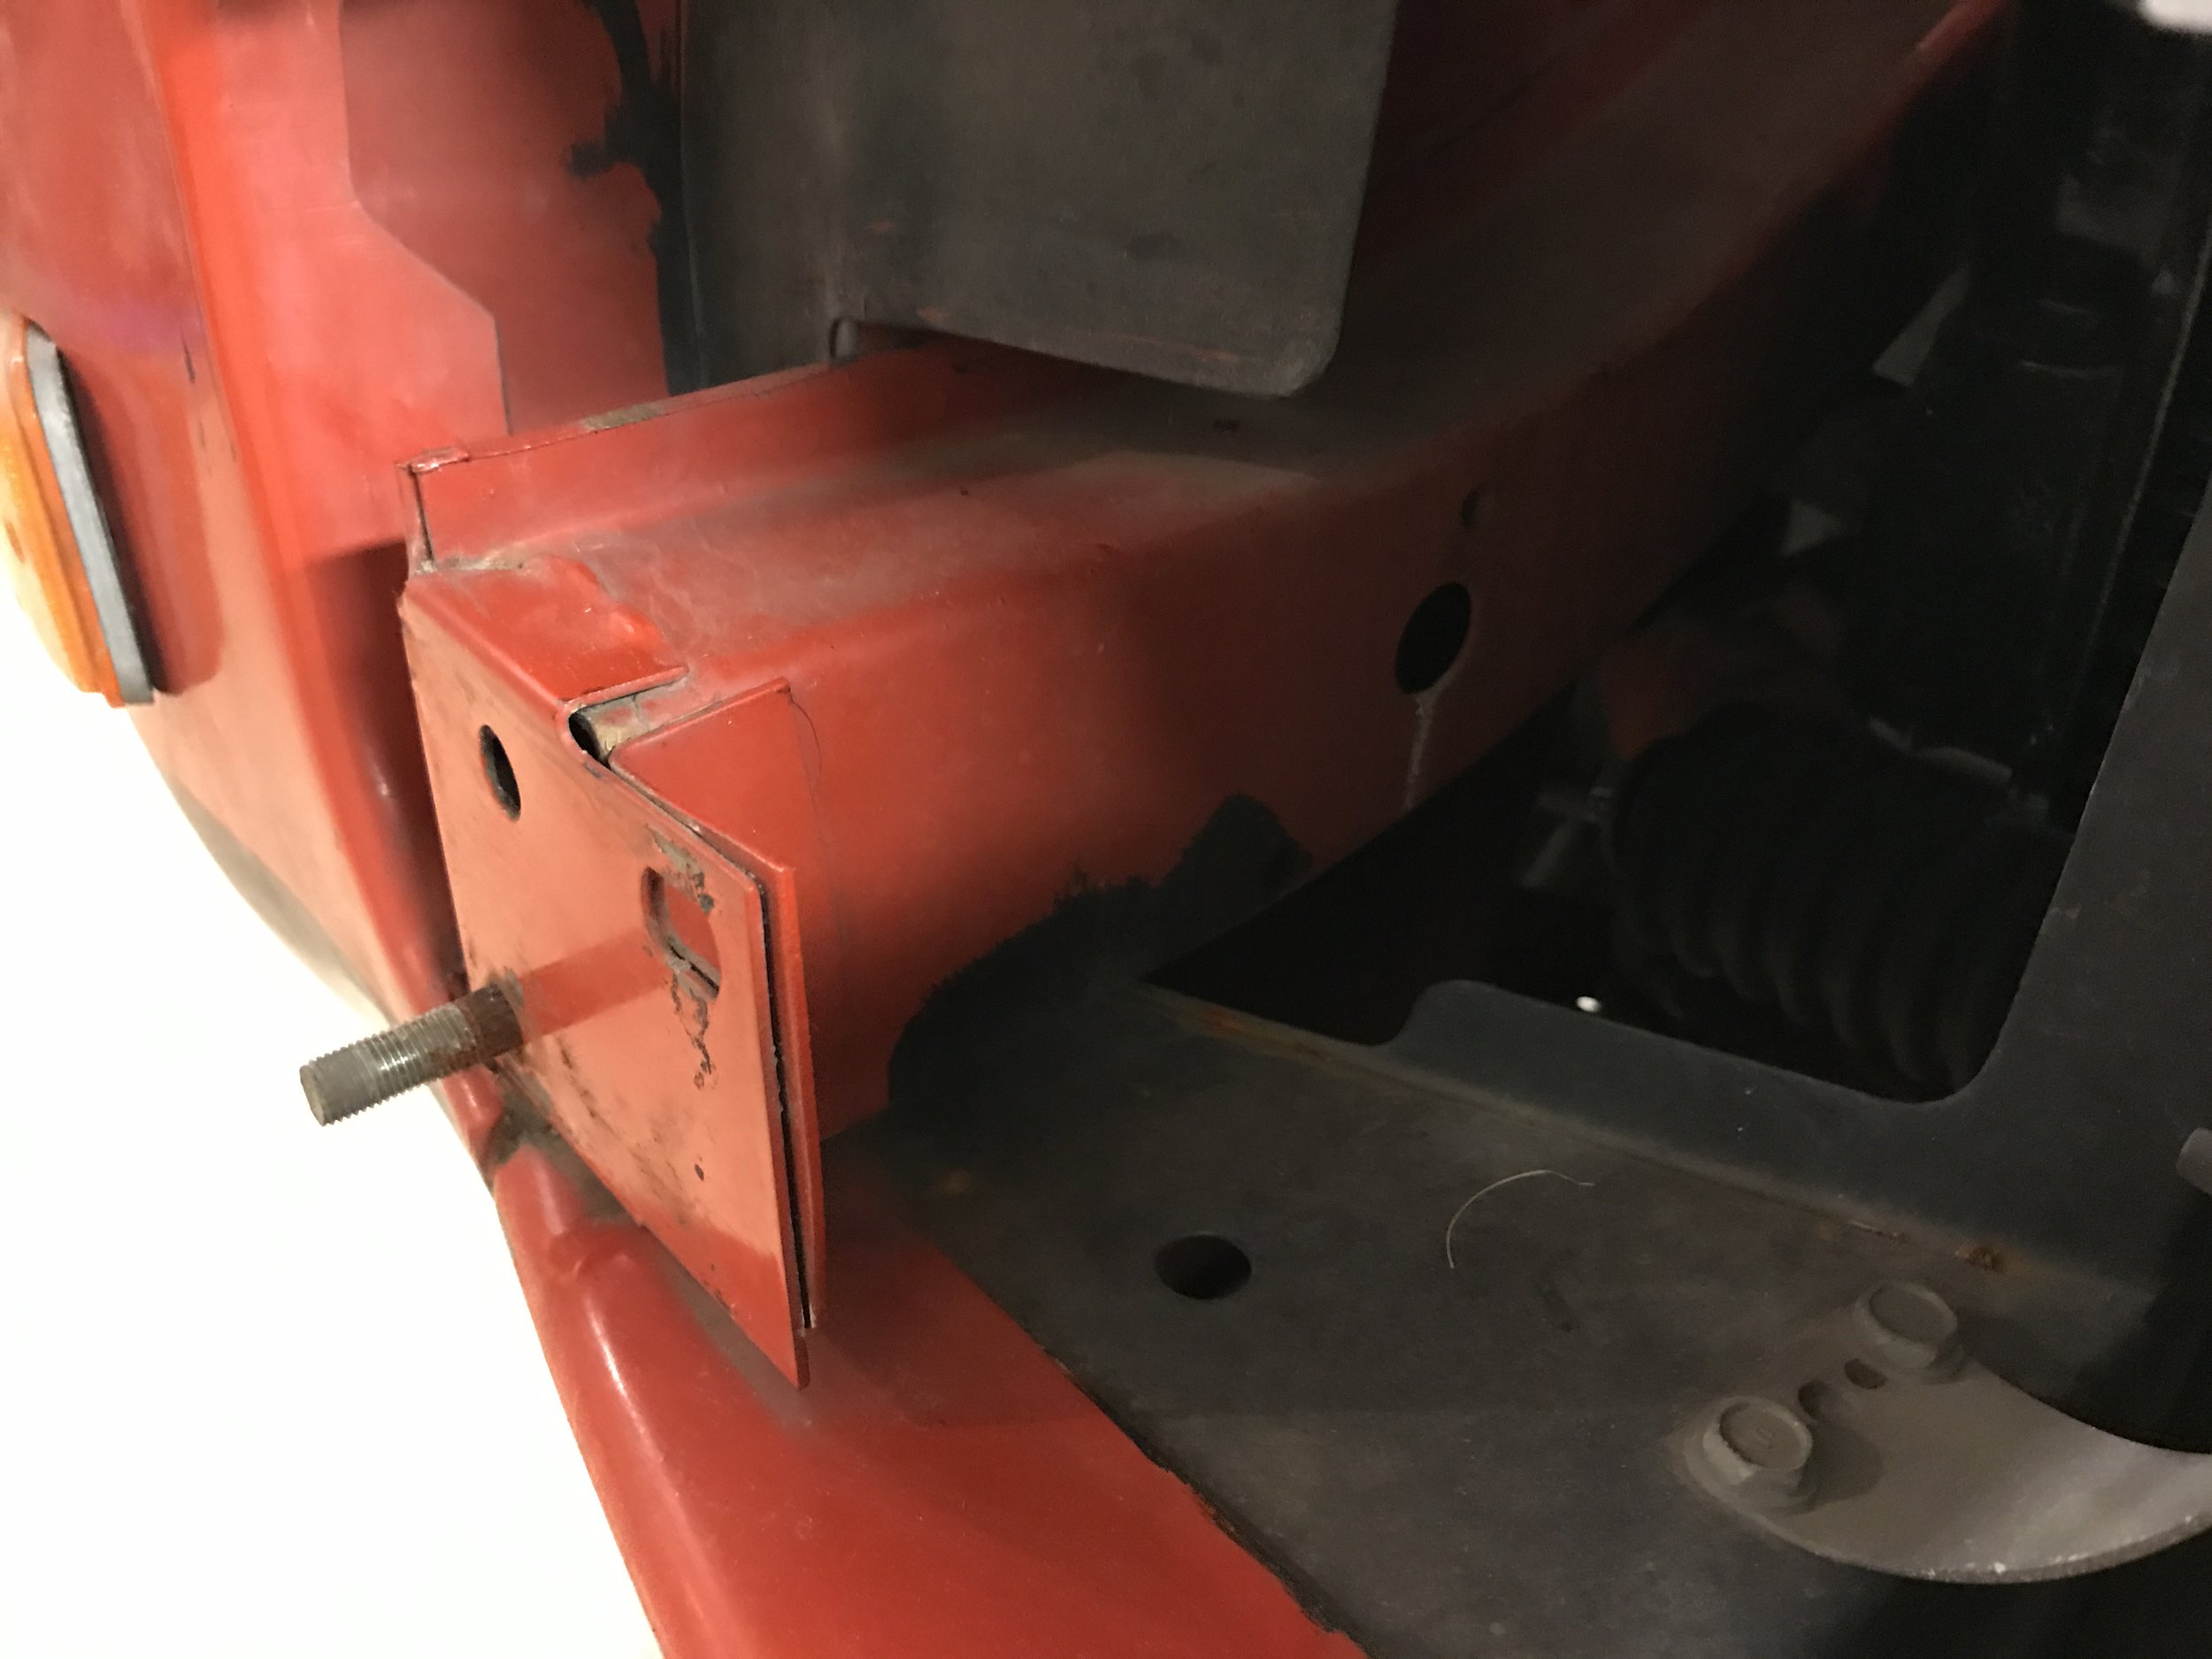
The bumper brackets are held on with a stud that is threaded into the bracket and a nut on a stud that is pressed into the rail.

Bumper bracket - it seemed easier to remove the bumper first, then the brackets. I could be wrong!
Bracket removed - that frame rail is certainly prominent! Looks like this project will get a little more involved!
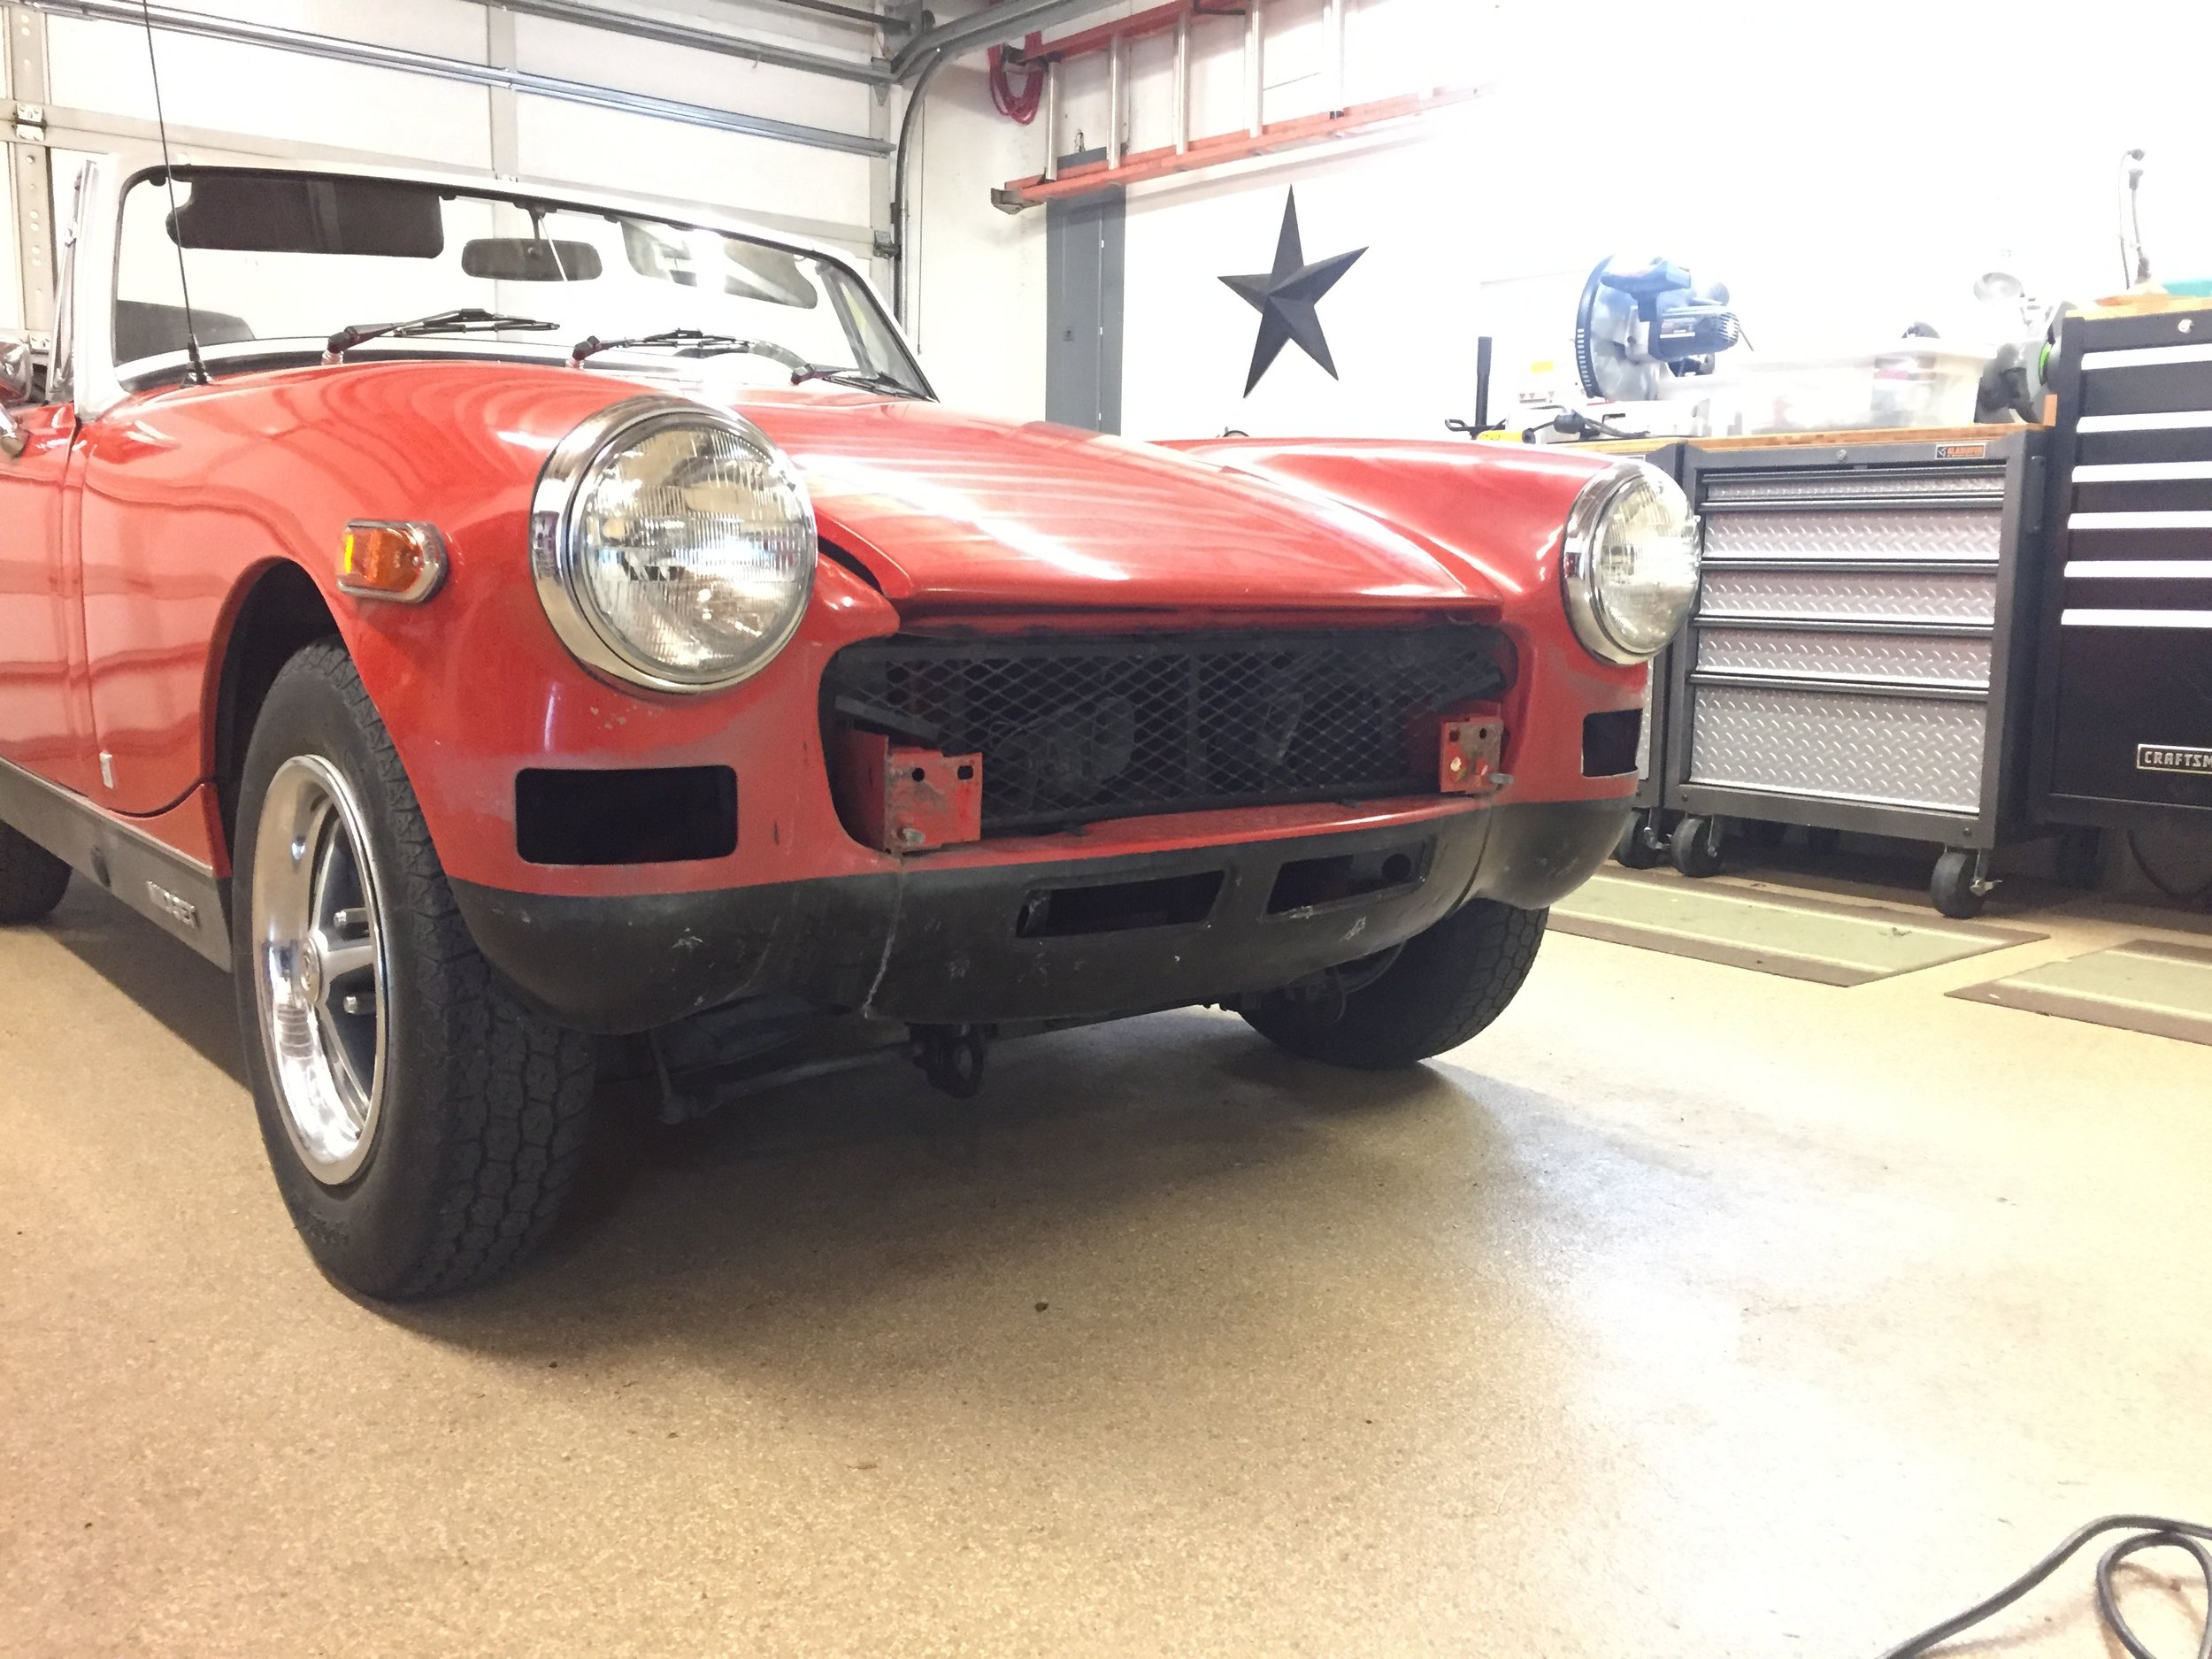
Even if I do nothing else the car already looks 100% better.
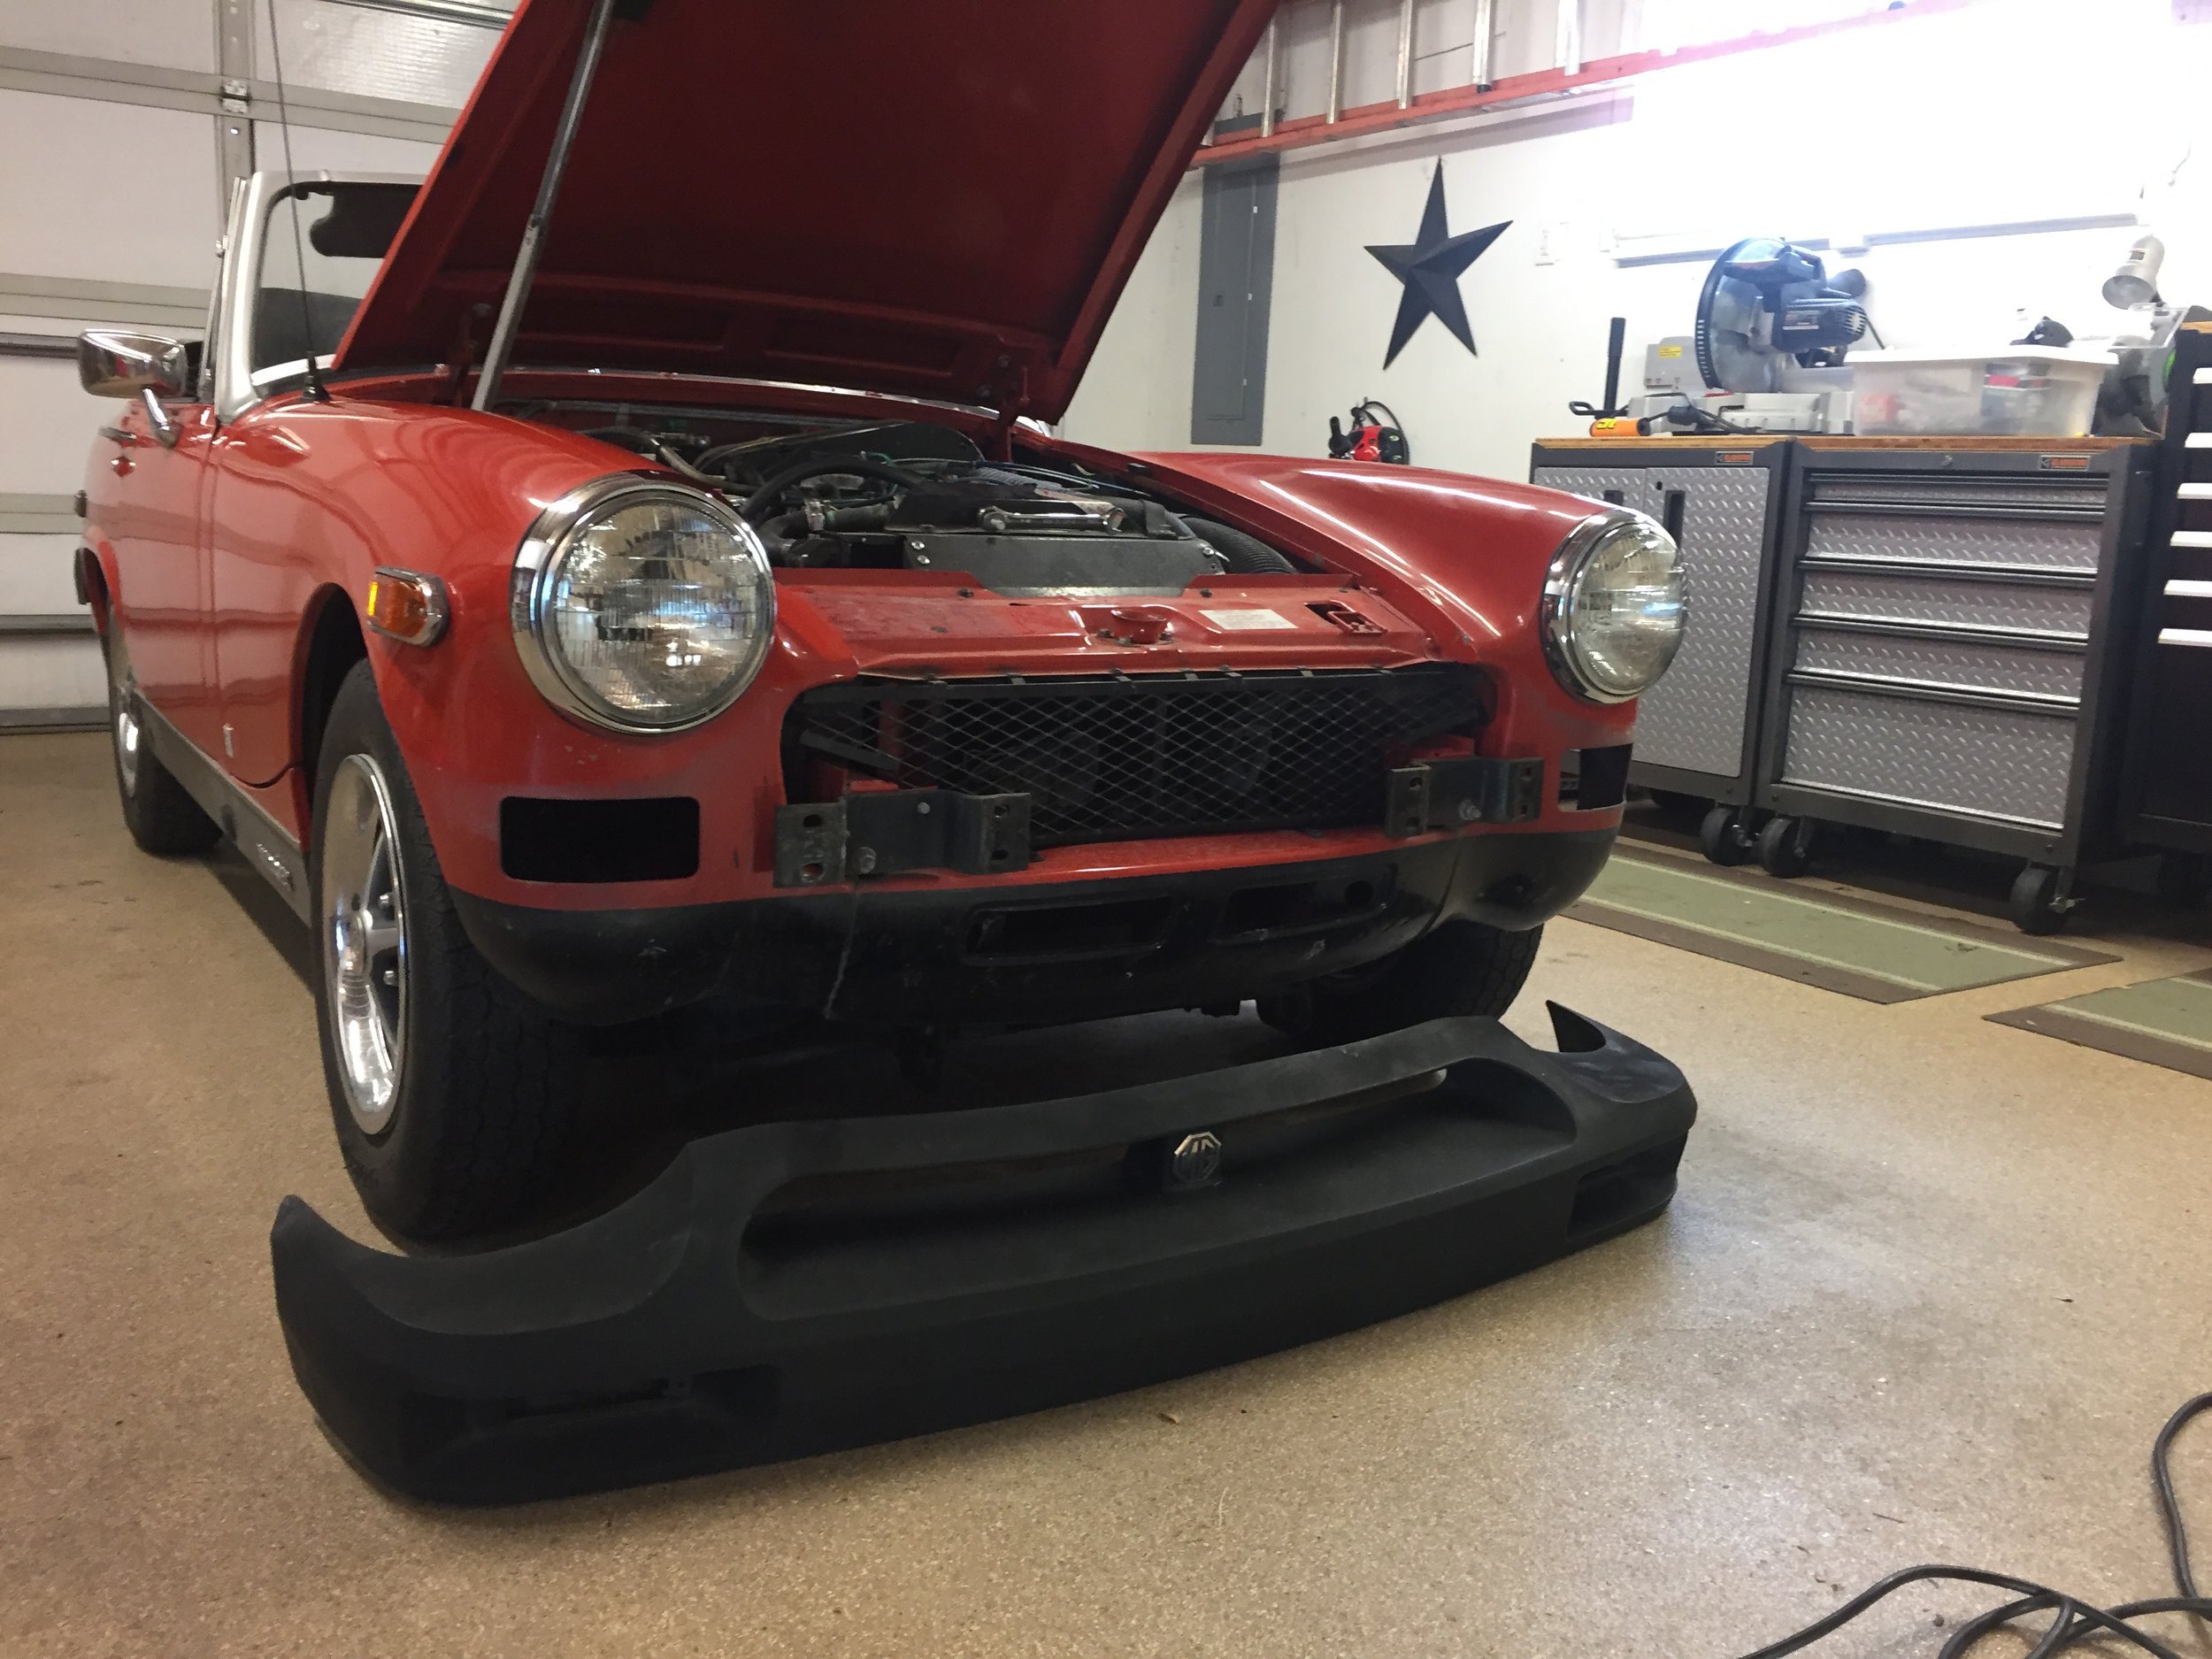
Next was shopping time. I decided to go with the early-70s style grille so it was time to hit eBay. I ordered a set of bumper brackets, a thicker late 60s chrome bumper with backing spring, a grille, and the grille surrounds. The brackets were about $30, the bumper assembly was $200 shipped, and the grille and surrounds were $200. The grille will need a little work, when it arrives we'll see just how much.
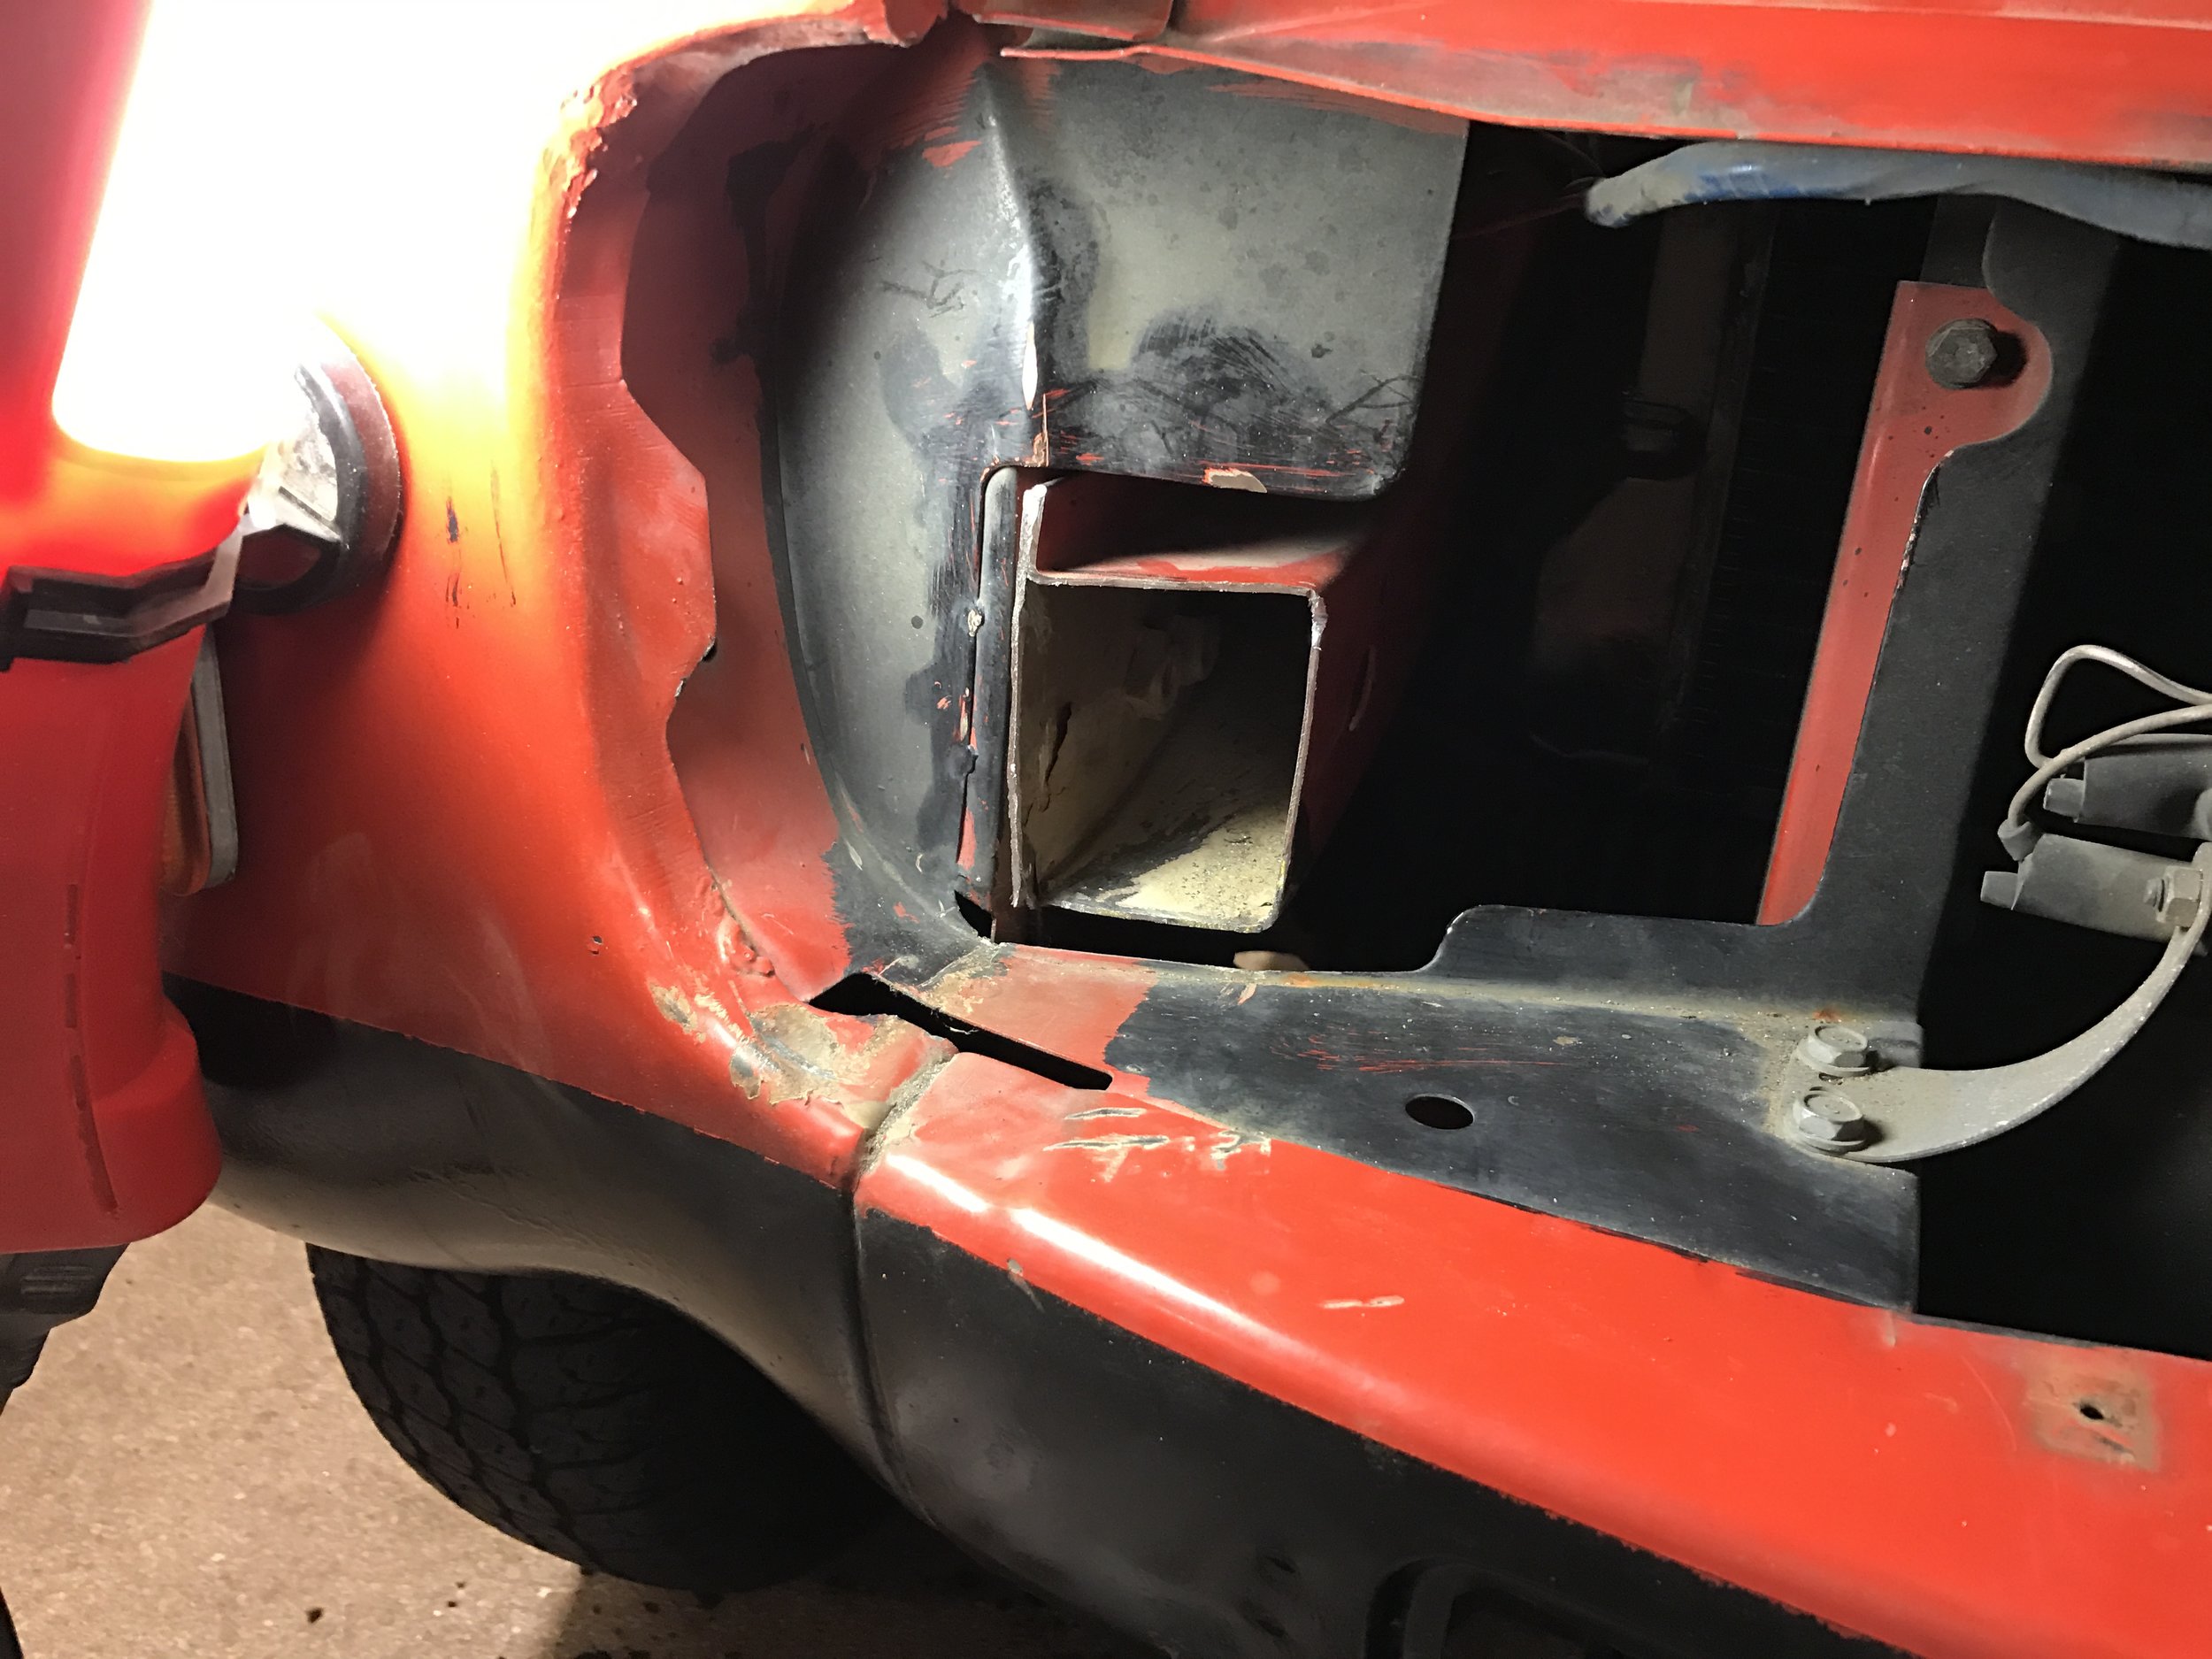
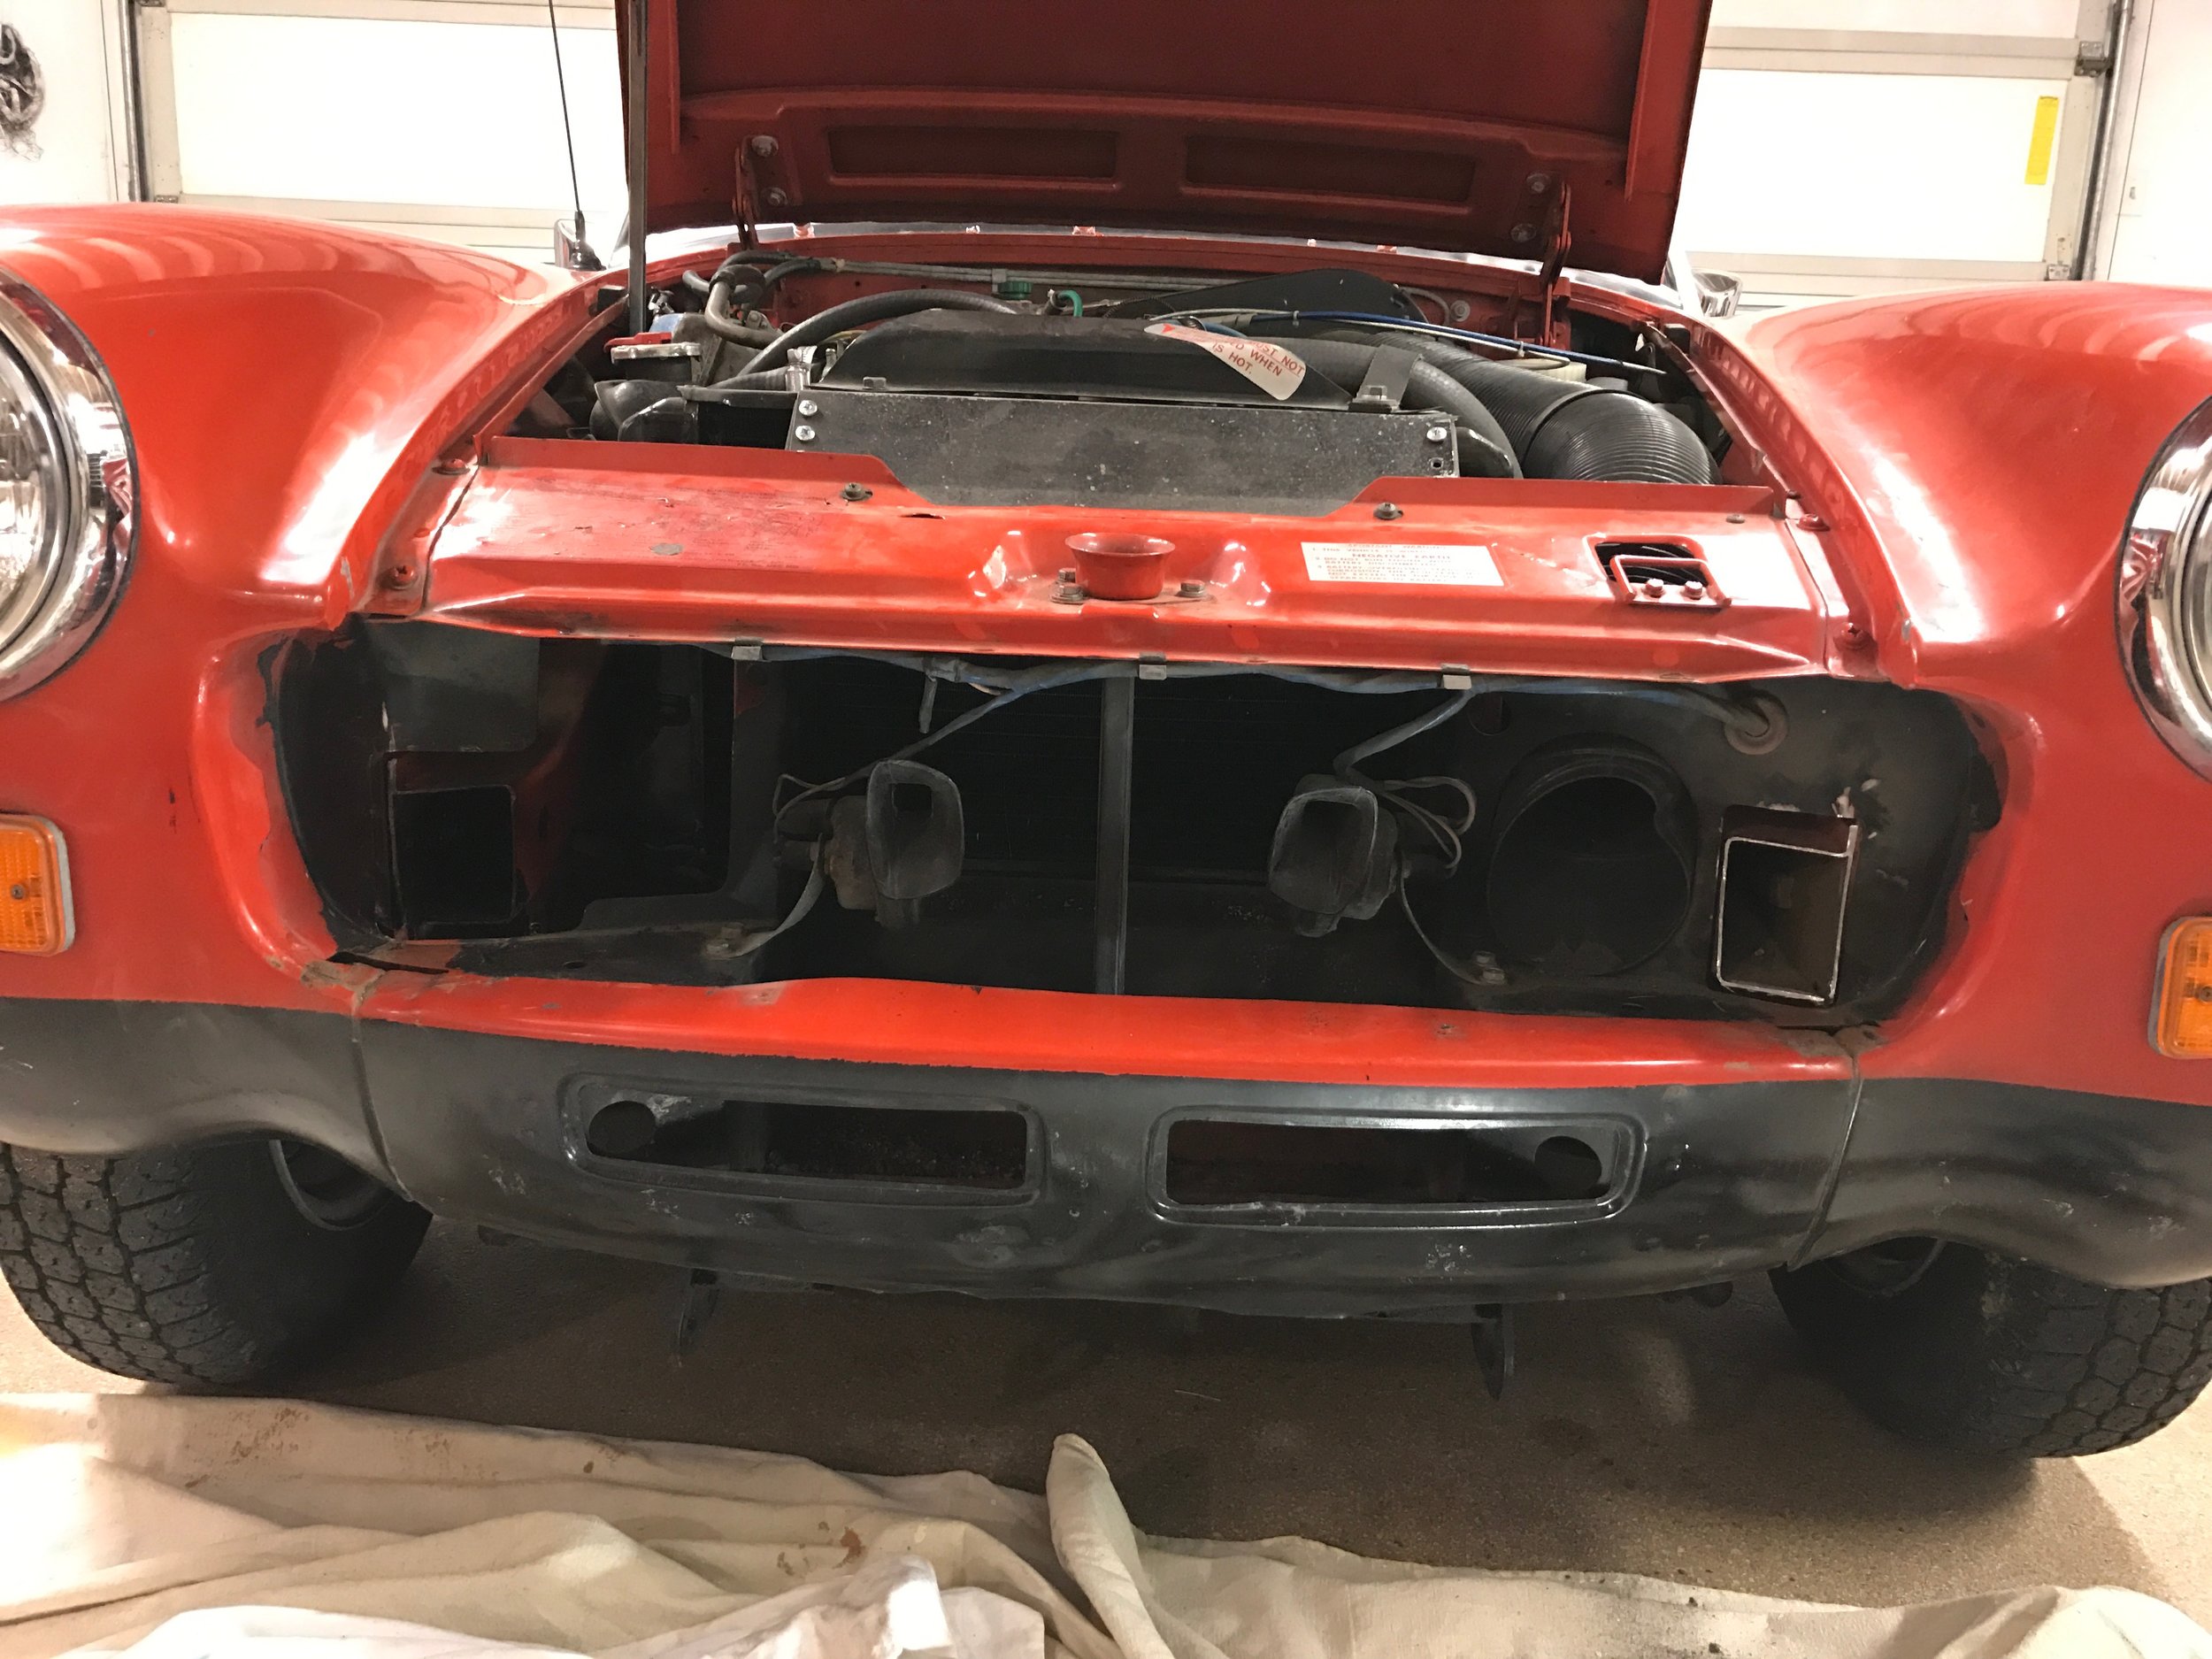
I can't see how any grille will fit in with things as-is. Those rails have to go. They're not attached to anything at all up front, I'm not worried about removing necessary strength. I collected the Sawzall, cutoff wheel, hacksaw, you name it. I wish I had a plasma cutter! Turns out, though, that the Dremel tool was the best thanks to its very small cutoff wheel. The steel is easy to cut and the challenge is really the small spaces. I don't want to do any more painting than is absolutely necessary (none, maybe? I hope?) and would like to make all the cuts without damaging surrounding panels. It took jacking the car up, a lot of contortion, and a bit of patience.
Looks like the best place to cut is along the black core support's contours. There is no connection to the surrounding sheet metal up front.
Chop! Time for a little paint to prevent rust and we're ready for that grille. If I can find someone to weld in a patch to close up the rail, I will. Or maybe it is time to buy a welder!
Sadly, after a few cuts on the right rail my faithful Dremel tool of 27 years died. That rail will have to wait until I can replace the tool. No rush, the grille won't be here until next week.

The bumper brackets arrived today. They look great - with a little black paint they're all ready to install. When the new Dremel arrives we'll resume the project. Did I mention the rear bumper situation?

Hmmm. There are a few challenges here, for sure. The space under the lights is very empty and the brackets have left quite a mark.
The rear bumper came off just as easily. Four bolts come out and the whole thing just lifts right off. It, too, is heavy, so good riddance for more than aesthetic reasons. I moved the license plate bracket down but it still looks a little weird wth the light wiring and the huge lights. I'll have to ponder that one.
There are filler pieces on eBay to put under the lights. That is some major body work, though, and I'm not ready to go there. I have ordered a few salvage bumper pieces to do some test fitting. Ideally, I'd like to put in the split chrome rear bumper, we'll see how it comes together.
UPS has come through and a lot of parts have arrived. Here's an update:

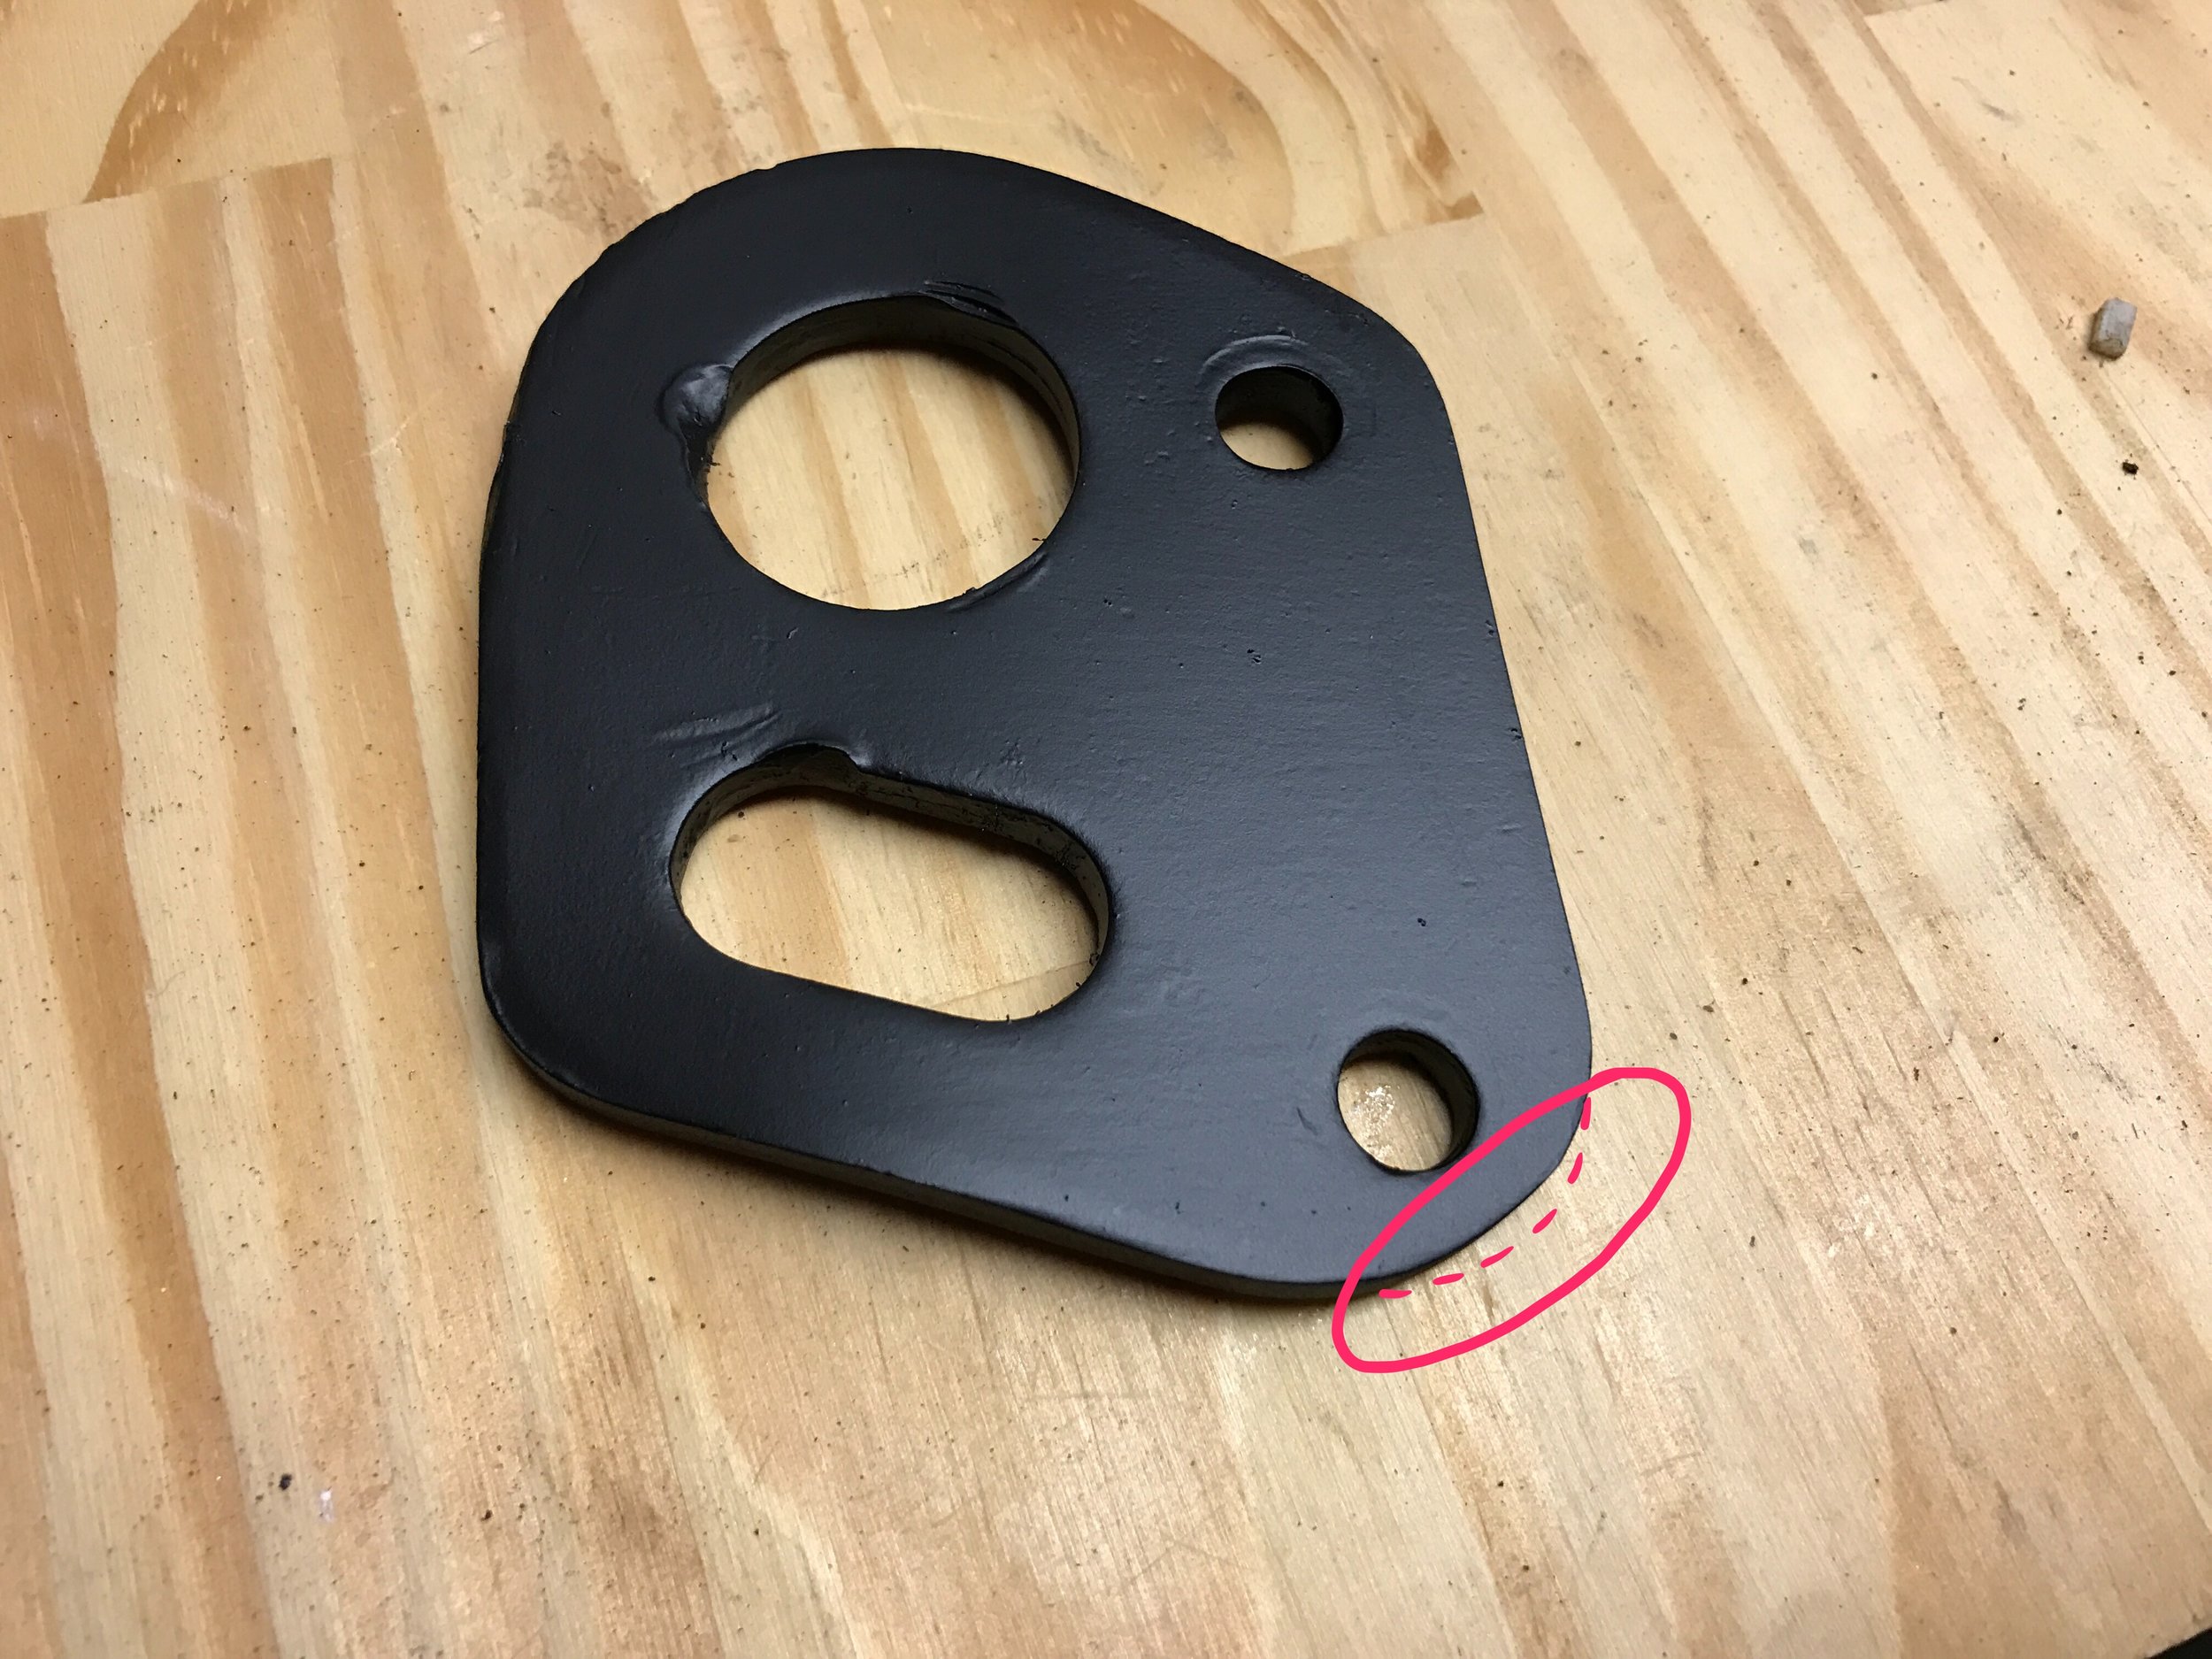
Here's the notch to make the bumper bracket fit
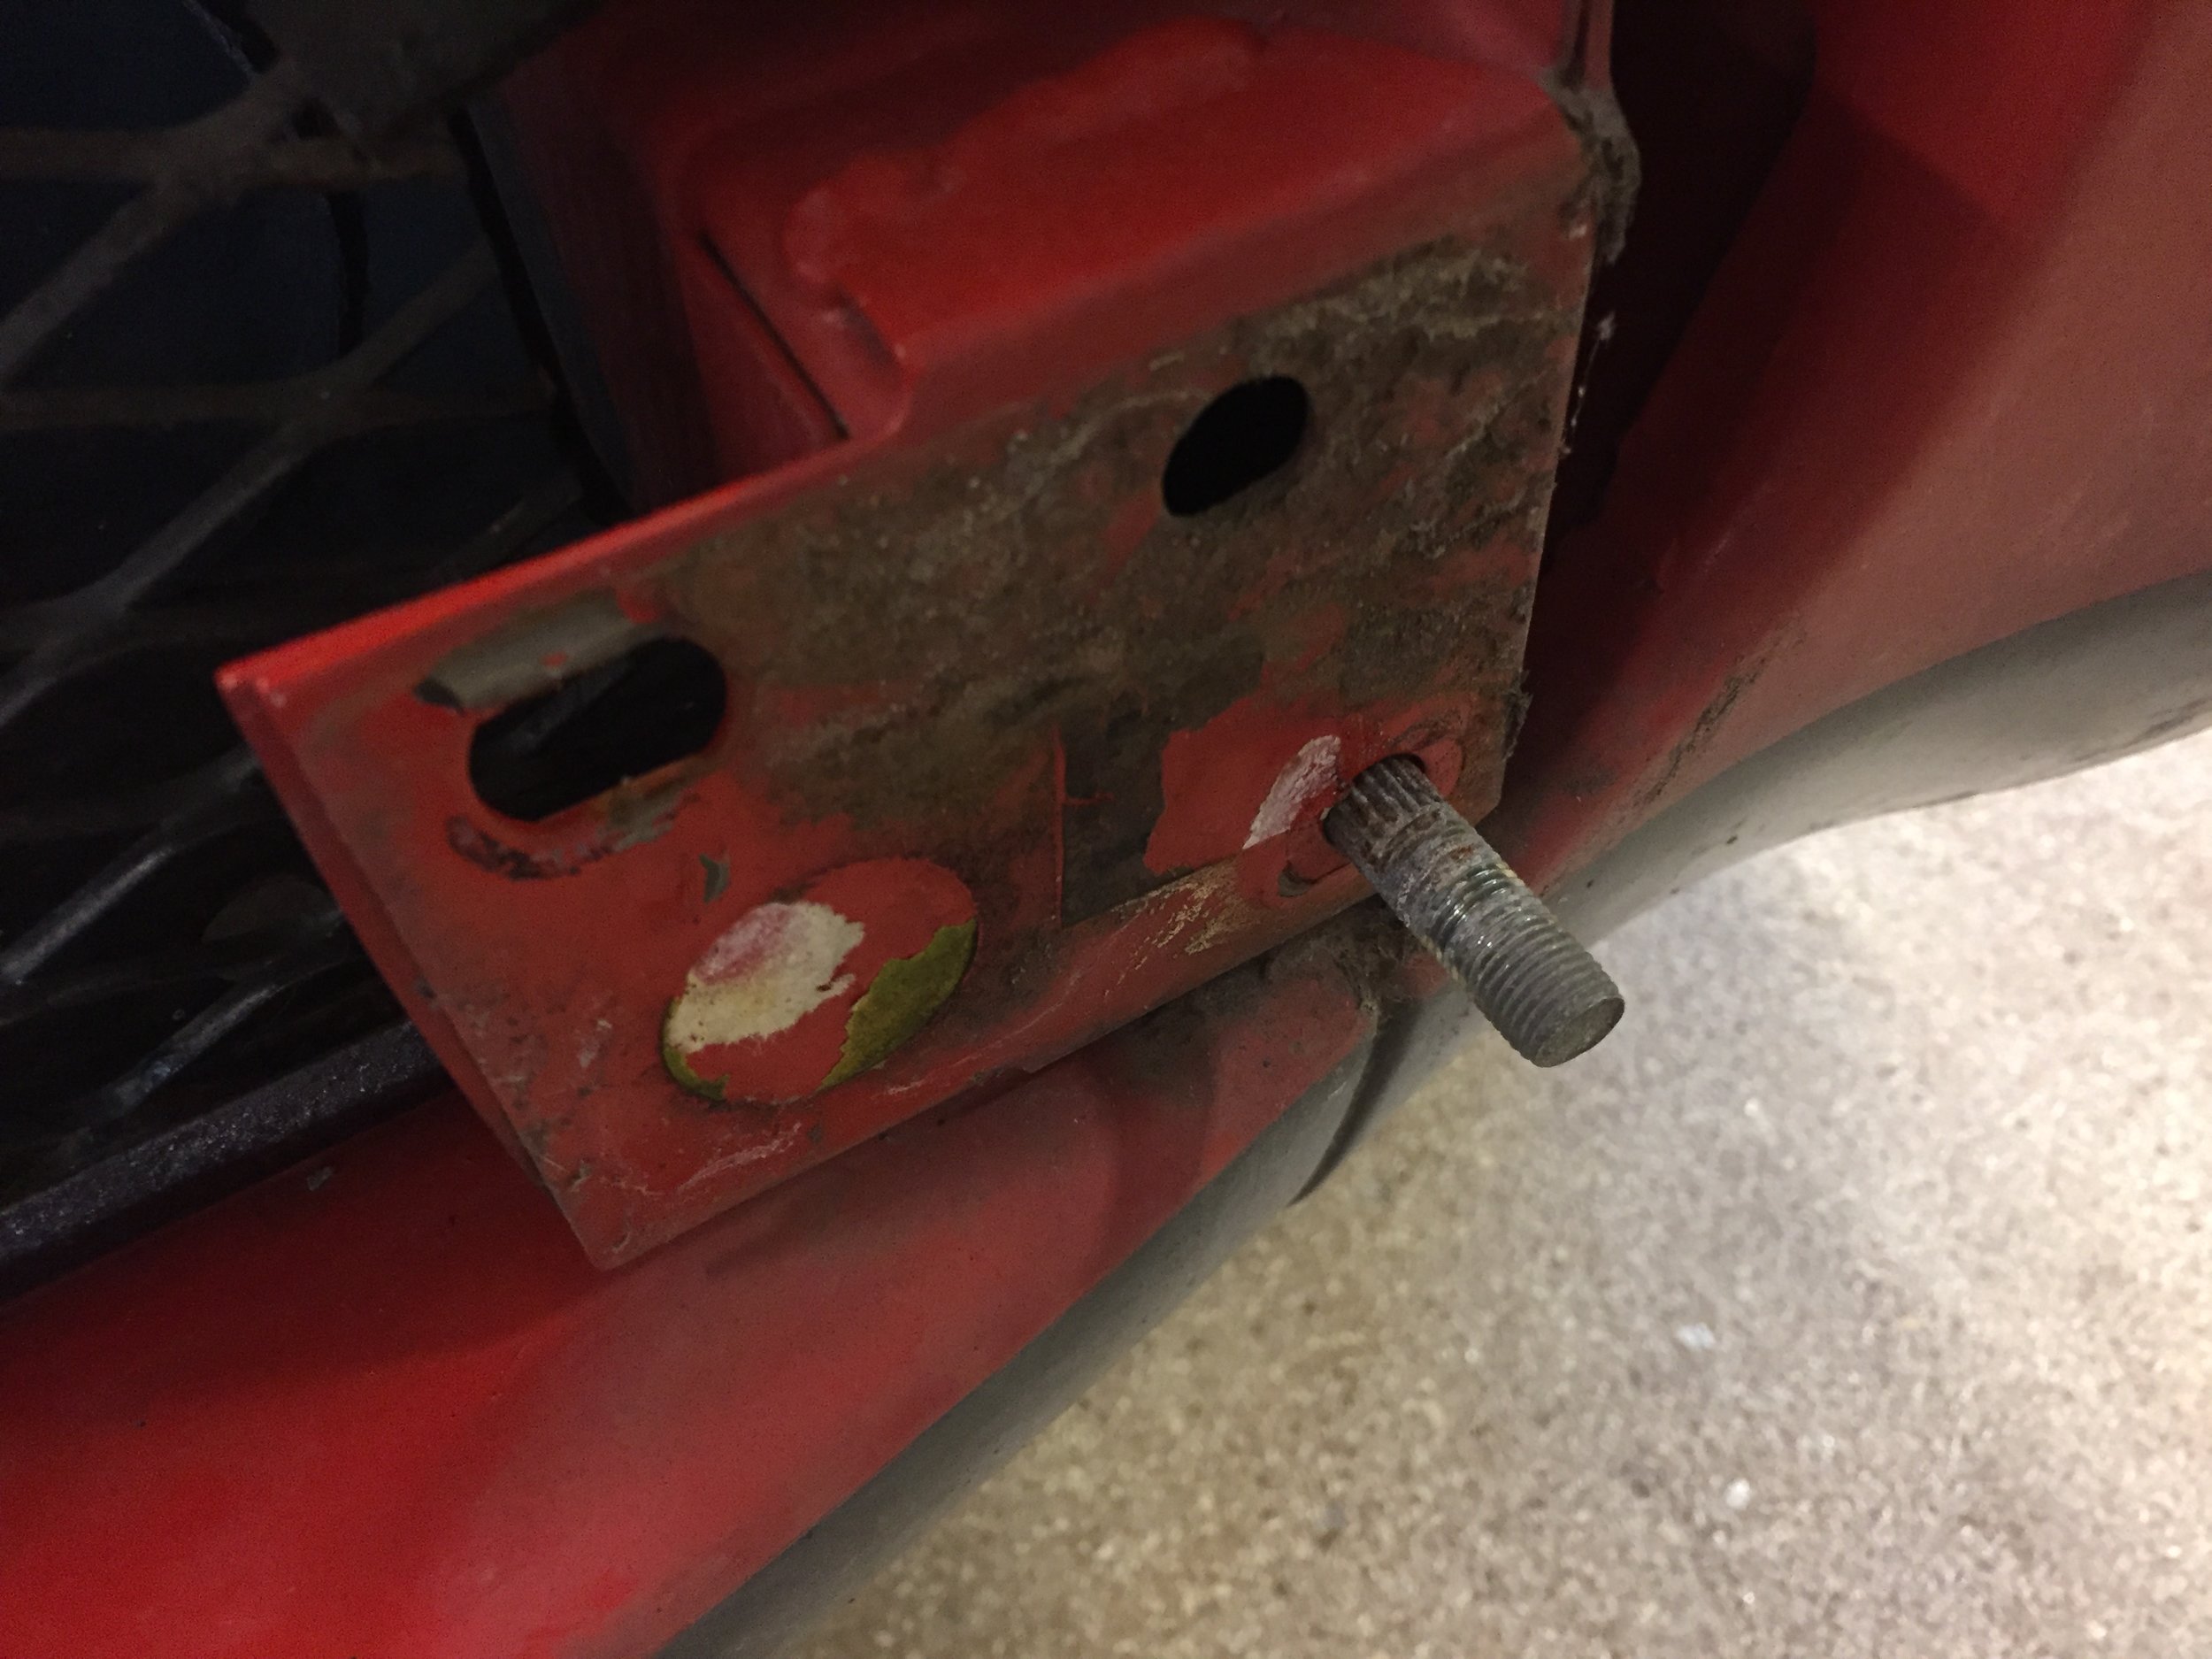
The bumper brackets almost fit. They interfere with the lower front panel at the holes where the brackets pass through. I had to file out the holes a little and notch the brackets to make everything fit. The bumper brackets bolt to the mounting point for the tie-down eyes, that requires removing the tie-downs. Since there is the possibility this car will end up on a tow truck at some point I wanted to keep the securing hardware. With the bumper bracket installed there is a little interference between the back of the eyes and the bracket. I took a little metal off the corner that overlapped so we could have both bumpers and tie-downs. I cleaned and painted everything so it lasts as long as possible.
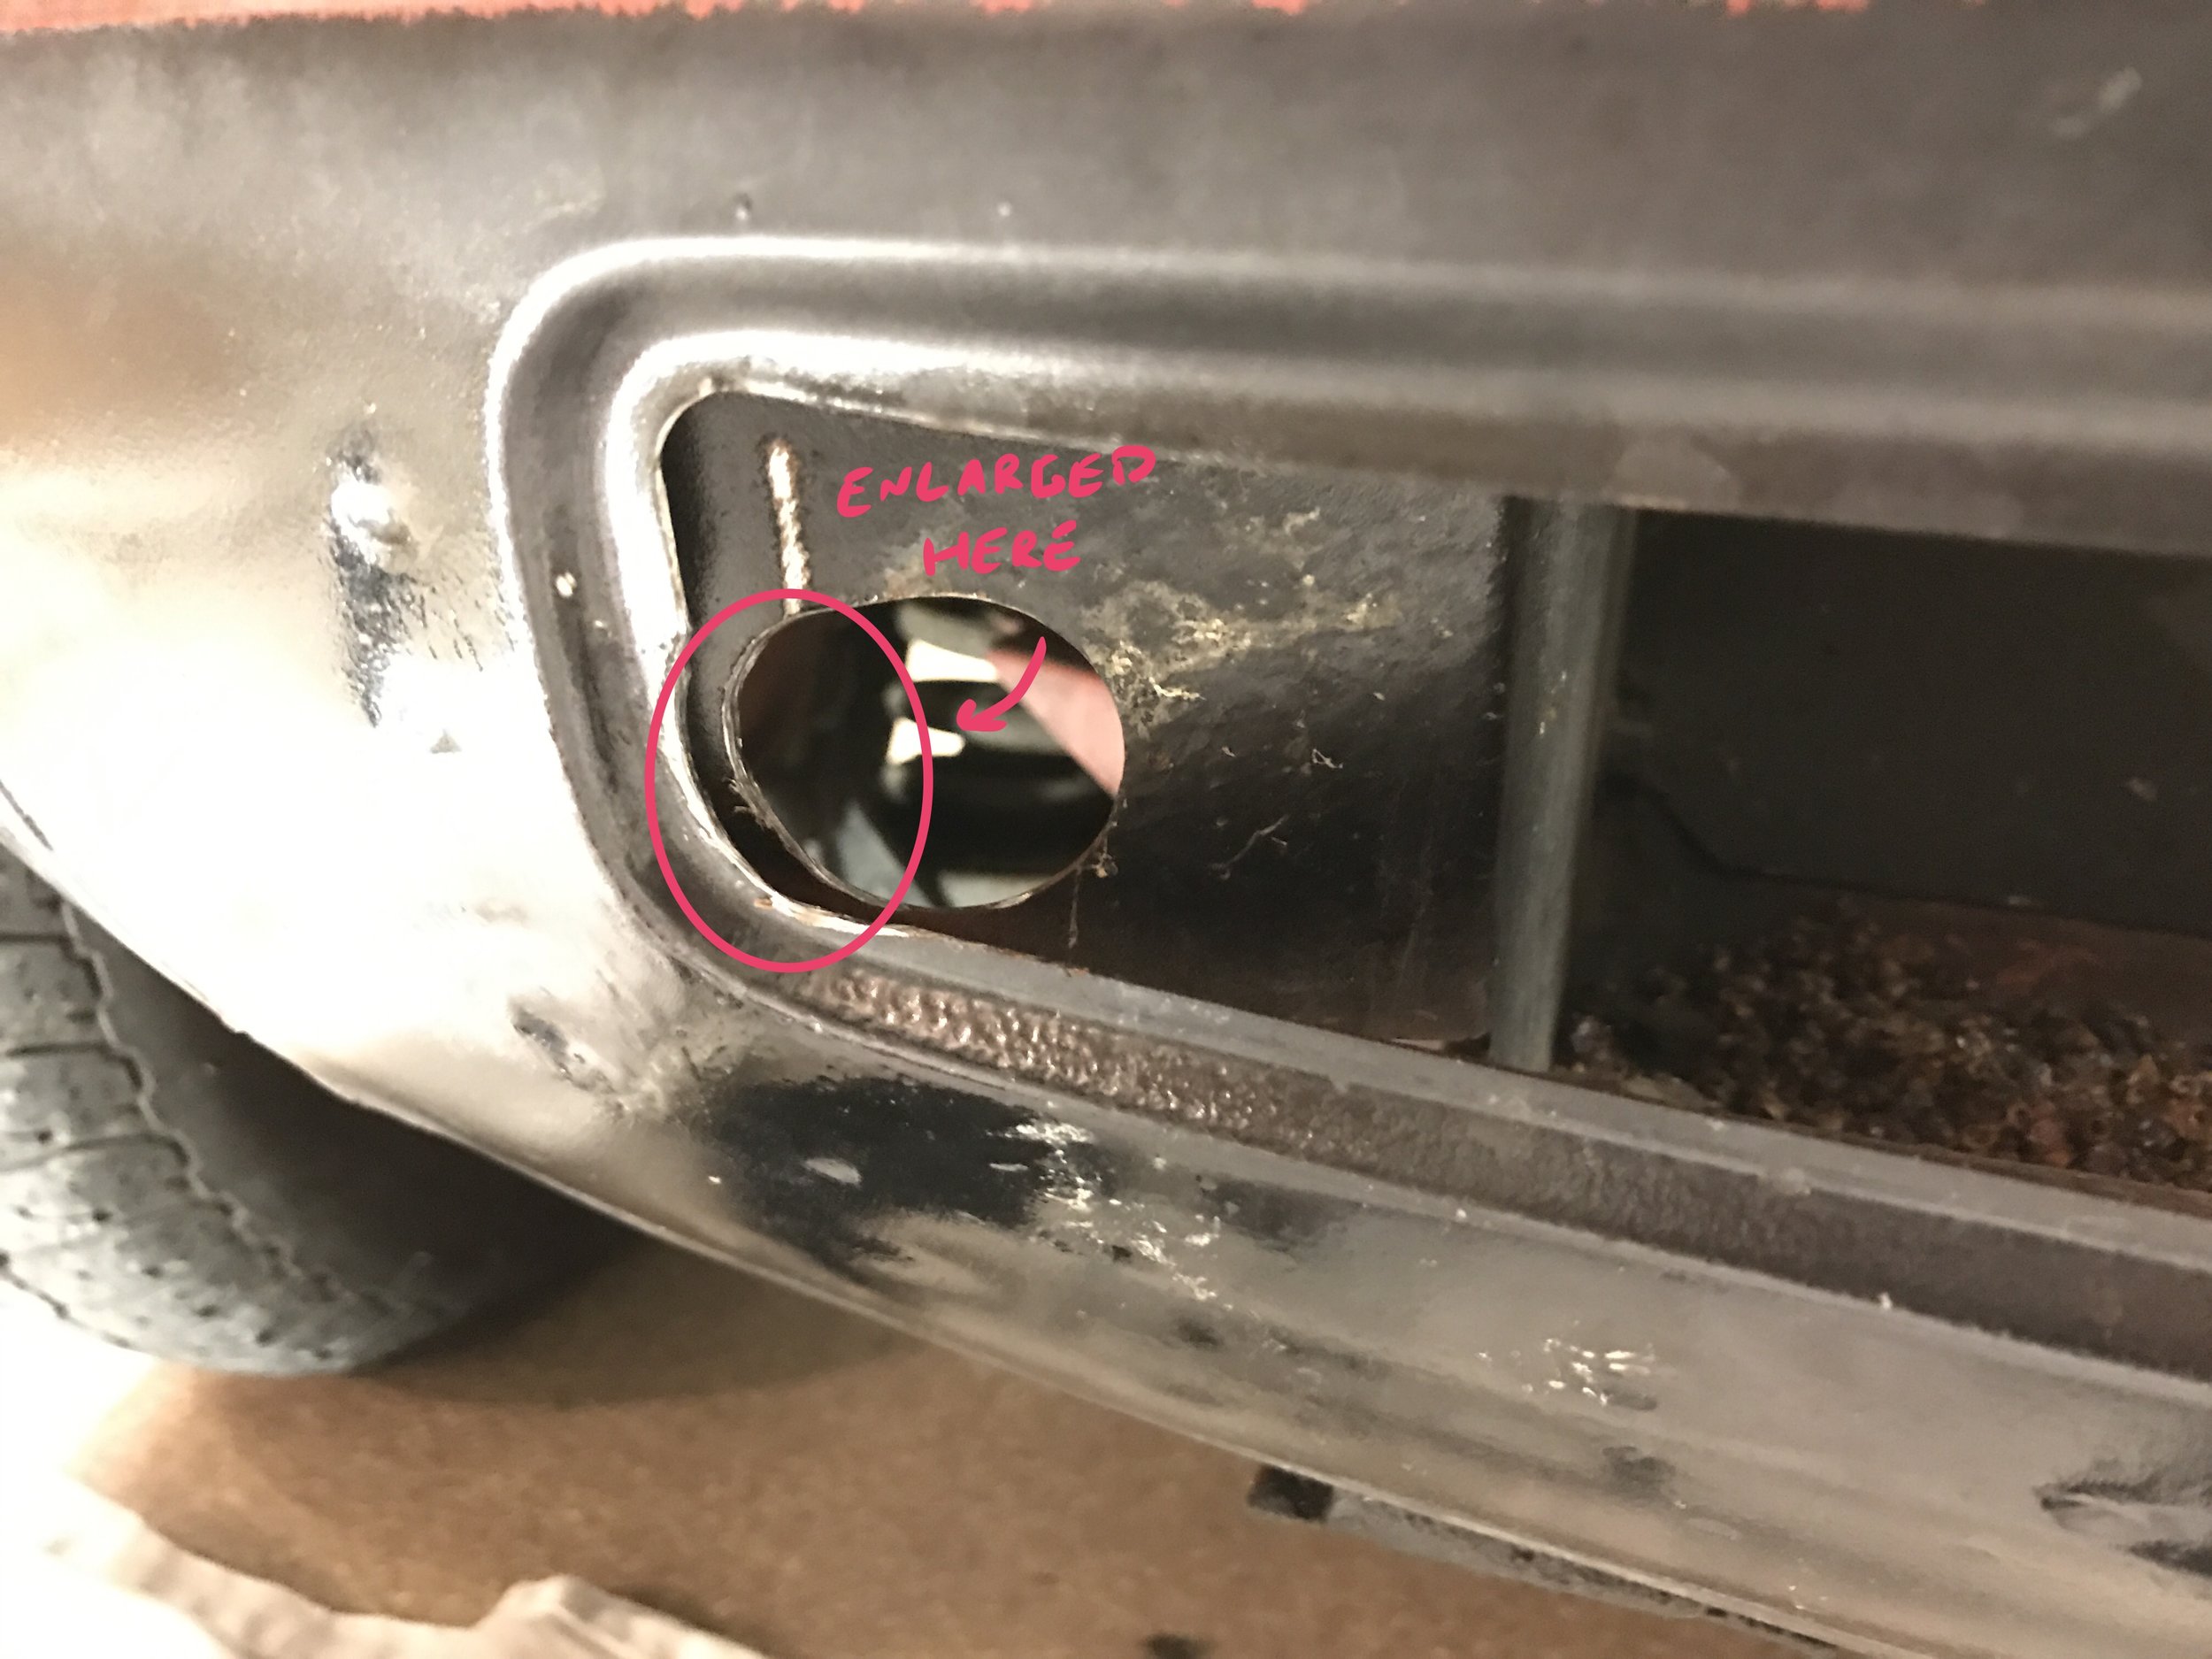
The opening for the bumper bracket needed to be filed open just a bit
It took a little trimming of both tie-down brackets to make them fit along with the replacement bumper brackets.
The grille also arrived. The paint was badly faded and while mostly solid there were a few cosmetic issues. I cleaned and painted it, installed a new MG emblem, and am just waiting for new plastic fasteners for the trim ring. The trim for the grille opening needed a little paint and polishing but is otherwise ready to go in. The bumper should be here Tuesday!

Cleaned up, painted, and new fasteners. Ready to go on!
A project like this is always a good reason to buy some new tools. When the new Dremel arrived I was able to remove the left frame rail horn. The right side is painted black, the left is still waiting its turn in this picture. As soon as I get some time off the grille can go in! It looks like it was originally riveted in but I'd rather use screws so it can be more easily removed if/when we do the body work to close the fender holes. I was at a body shop today for an unrelated project and couldn't help but ask for an estimate. Can't wait to see what they say!

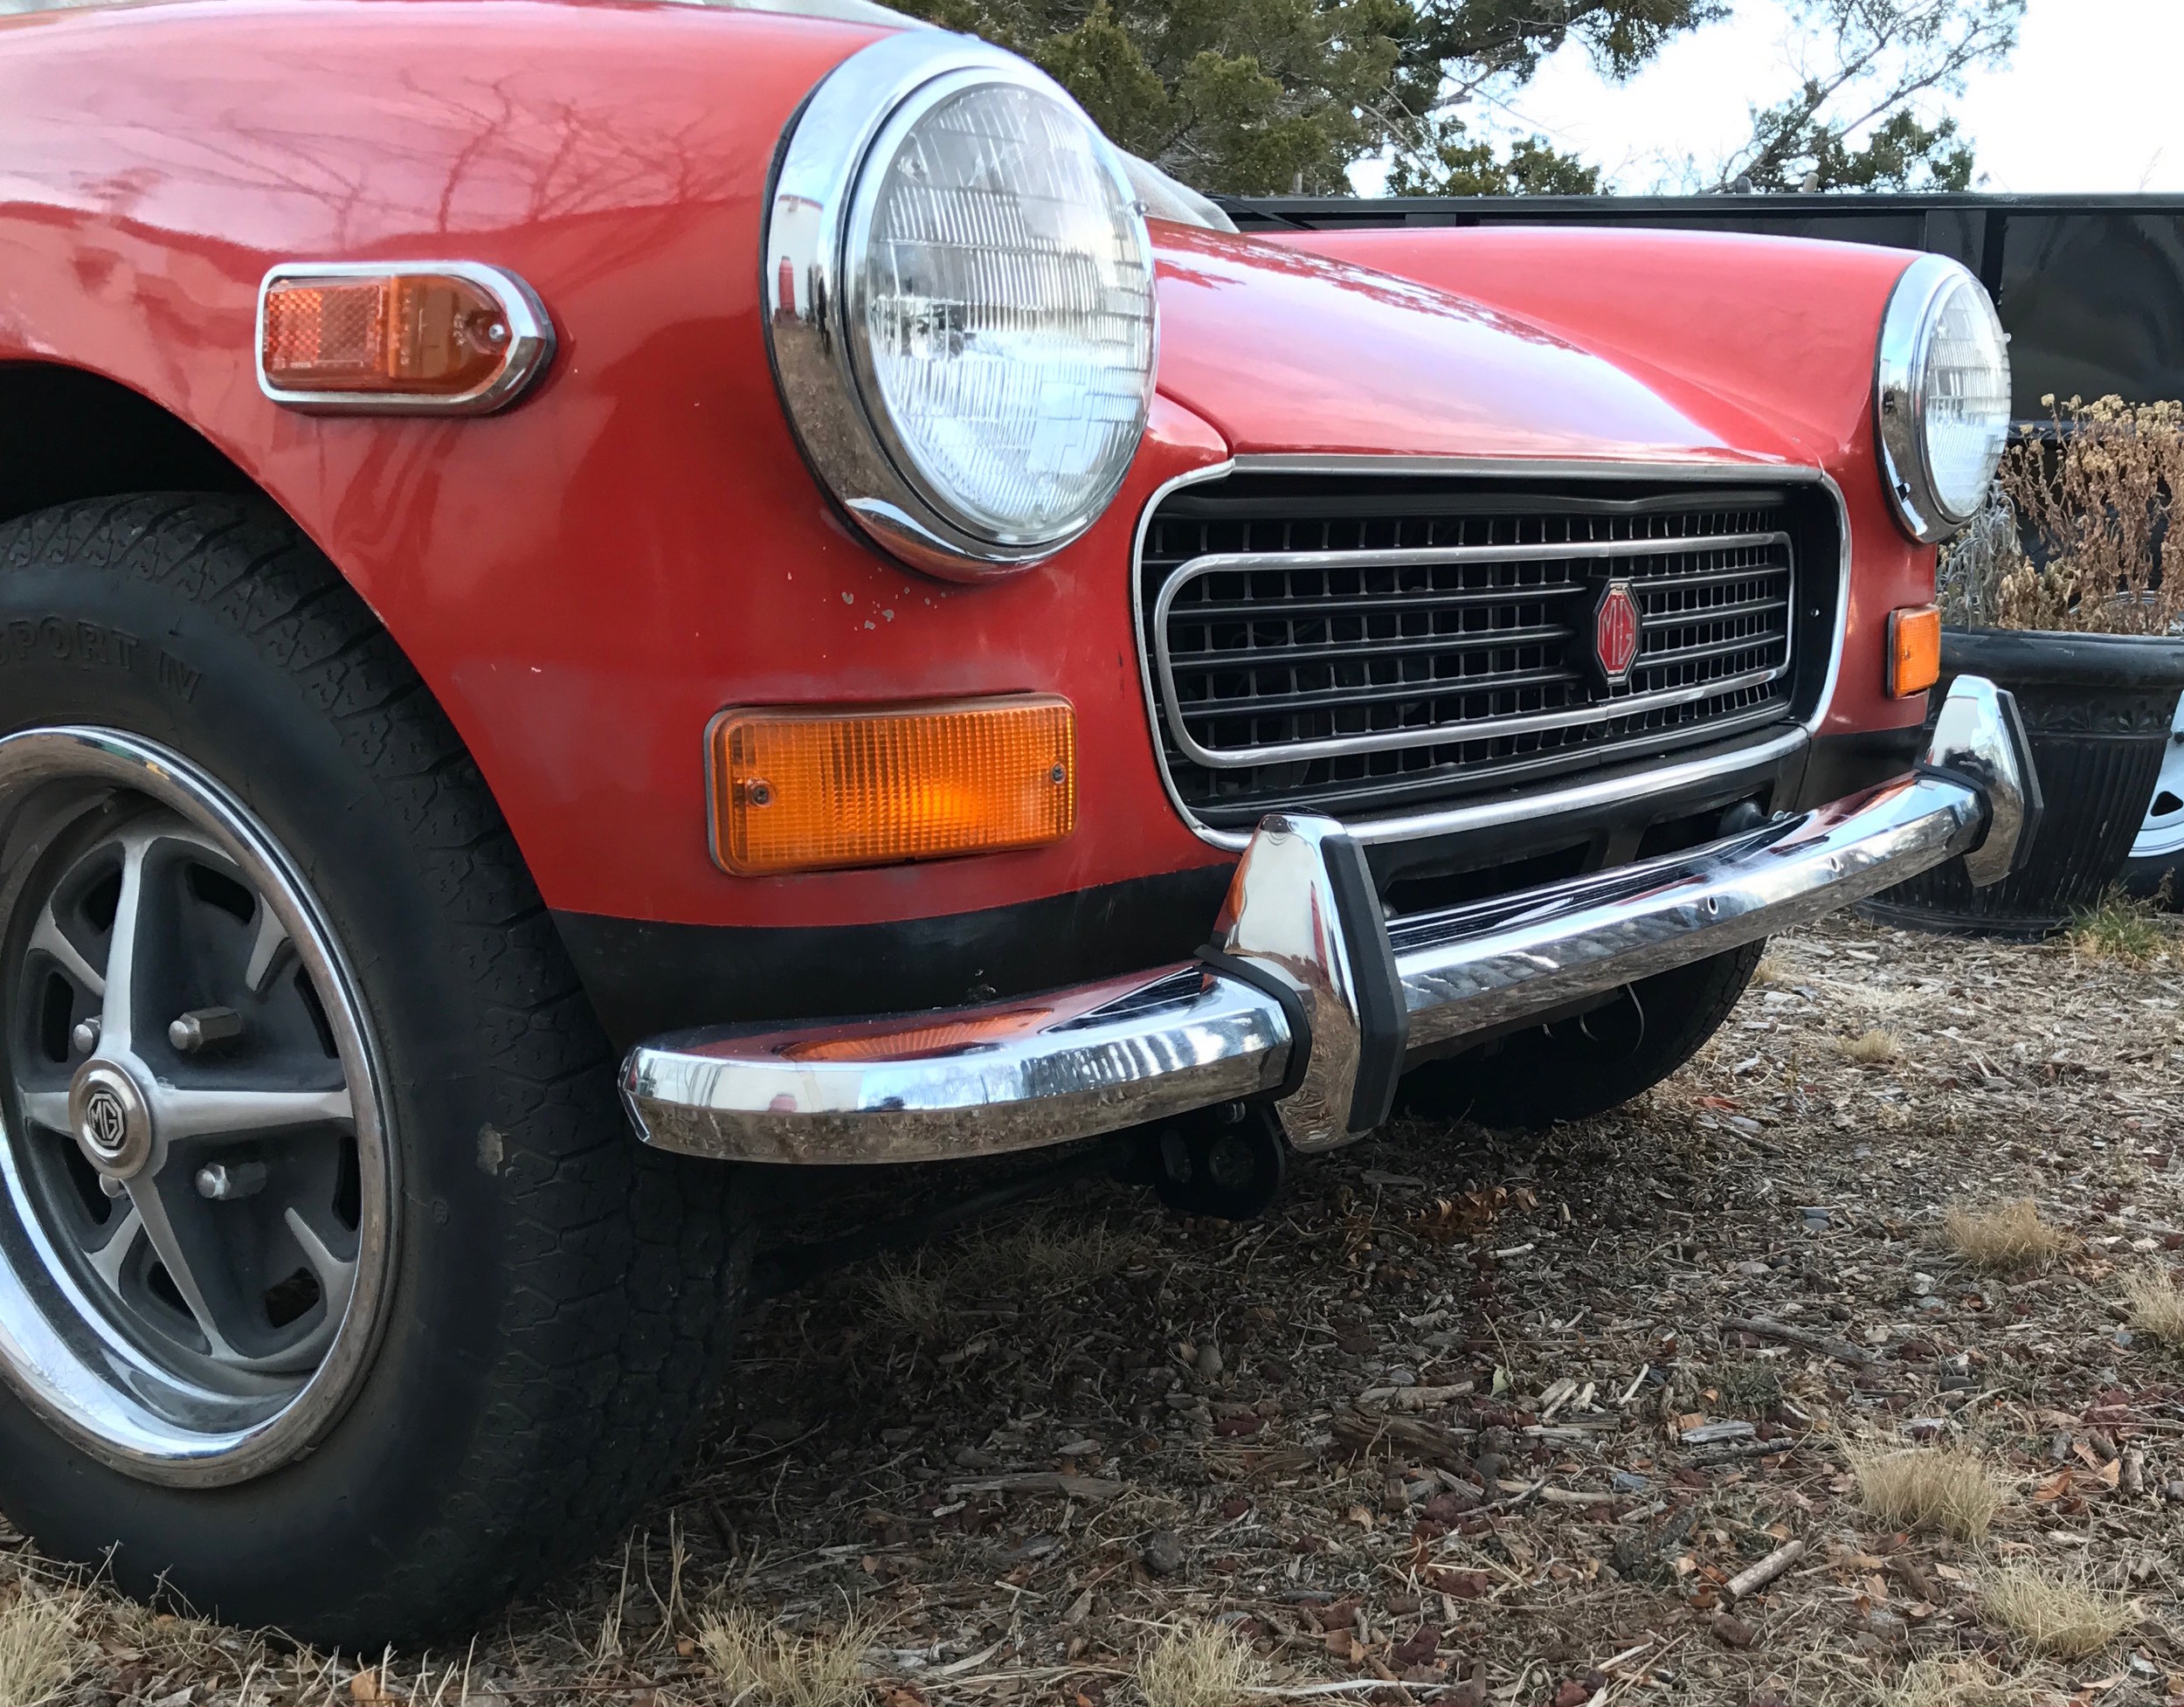
Grille installed! I used rivets after all for the trim, there's no way the grille could fit over screw heads.
Well, mixed bag. The bumper arrived and was so bent I couldn't even mock it into place. It is going back. I found an NOS one on eBay and hopefully it lives up to its description. We'll find out next week! One the upside, the grille went in well and I'm quite happy with the outcome. If this front bumper fits well and looks good we'll move on to the dreaded rear bumper.
You can see in the photo above that I have temporarily filled the giant holes in the fenders. I took the light fixtures from the rubber bumpers and screwed them to a couple pieces of 3/4 inch PVC pipe that is a little longer than the bumper holes are tall. That holds the lights in place (keeping me road legal-ish) while I decide what the long-term solution will be. I just used the original mounting screws and holes and the PVC is soft enough that it isn't making any marks in the steel. It sure doesn't look "right" but at least I have turn signals. Next upgrade: electronic flasher.
The real deal! Not the cheapest solution, but really not that much more than reproductions from Moss or VB. And it's cool.
Everything has arrived! The bumper looks fabulous, the chrome is nearly perfect. I had to also buy the backing spring, the overriders, and some mounting hardware. There are two larger bolts that hold the spring to the bumper by threading into inserts in the overriders and three smaller ones that thread into bungs that are welded to the bumper itself. There are no nuts used. There are two little brackets that fit between the spring and the face bar, behind the overriders.
It went together pretty smoothly. No surprise, it didn't fit perfectly, but there was no cutting or trimming necessary. The threads were not good in one overrider, I had to run them with a 3/8-24 tap. From looking at the Victoria British catalog I thought I would need some chrome bolts that would be seen through the front with nuts behind the springs. Nope! The only visible holes are the license plate mounts. There are no front plates here in NM so I'll find a nice way to fill them.
All bolted together - bolt, lock and flat washer, spring, bracket, face bar, and then the overrider on the left. Right side is just bolt, washers, and easy easy.

Next is the rear bumper. Ebay again came through with some salvage-quality split bumper halves. They are in terrible shape but at least allowed me to mock up a potential answer for the back. Of the four mounting points the rubber and chrome bumpers only share one. One of four is far and away better than zero of four, though, it means finding the others was much easier. One problem came up for the right side, that one hole wasn't in exactly the right place. The bumper needed to move in by less than 1/2 inch, too small a change to just drill another hole. I was able to twist the bracket a little and match things right up. That moved the bumper down a hair, it was a small enough change you can't tell. The biggest catch was that the top mounting hole now lines up with the rear frame rail. There's no good way to attach it so the bumper will be held on by three of the four mounting points. Turns out that's pretty good, when I try to move it things feel quite solid.

With no adjustment the curve of the bumper doesn't match the contour of the light.
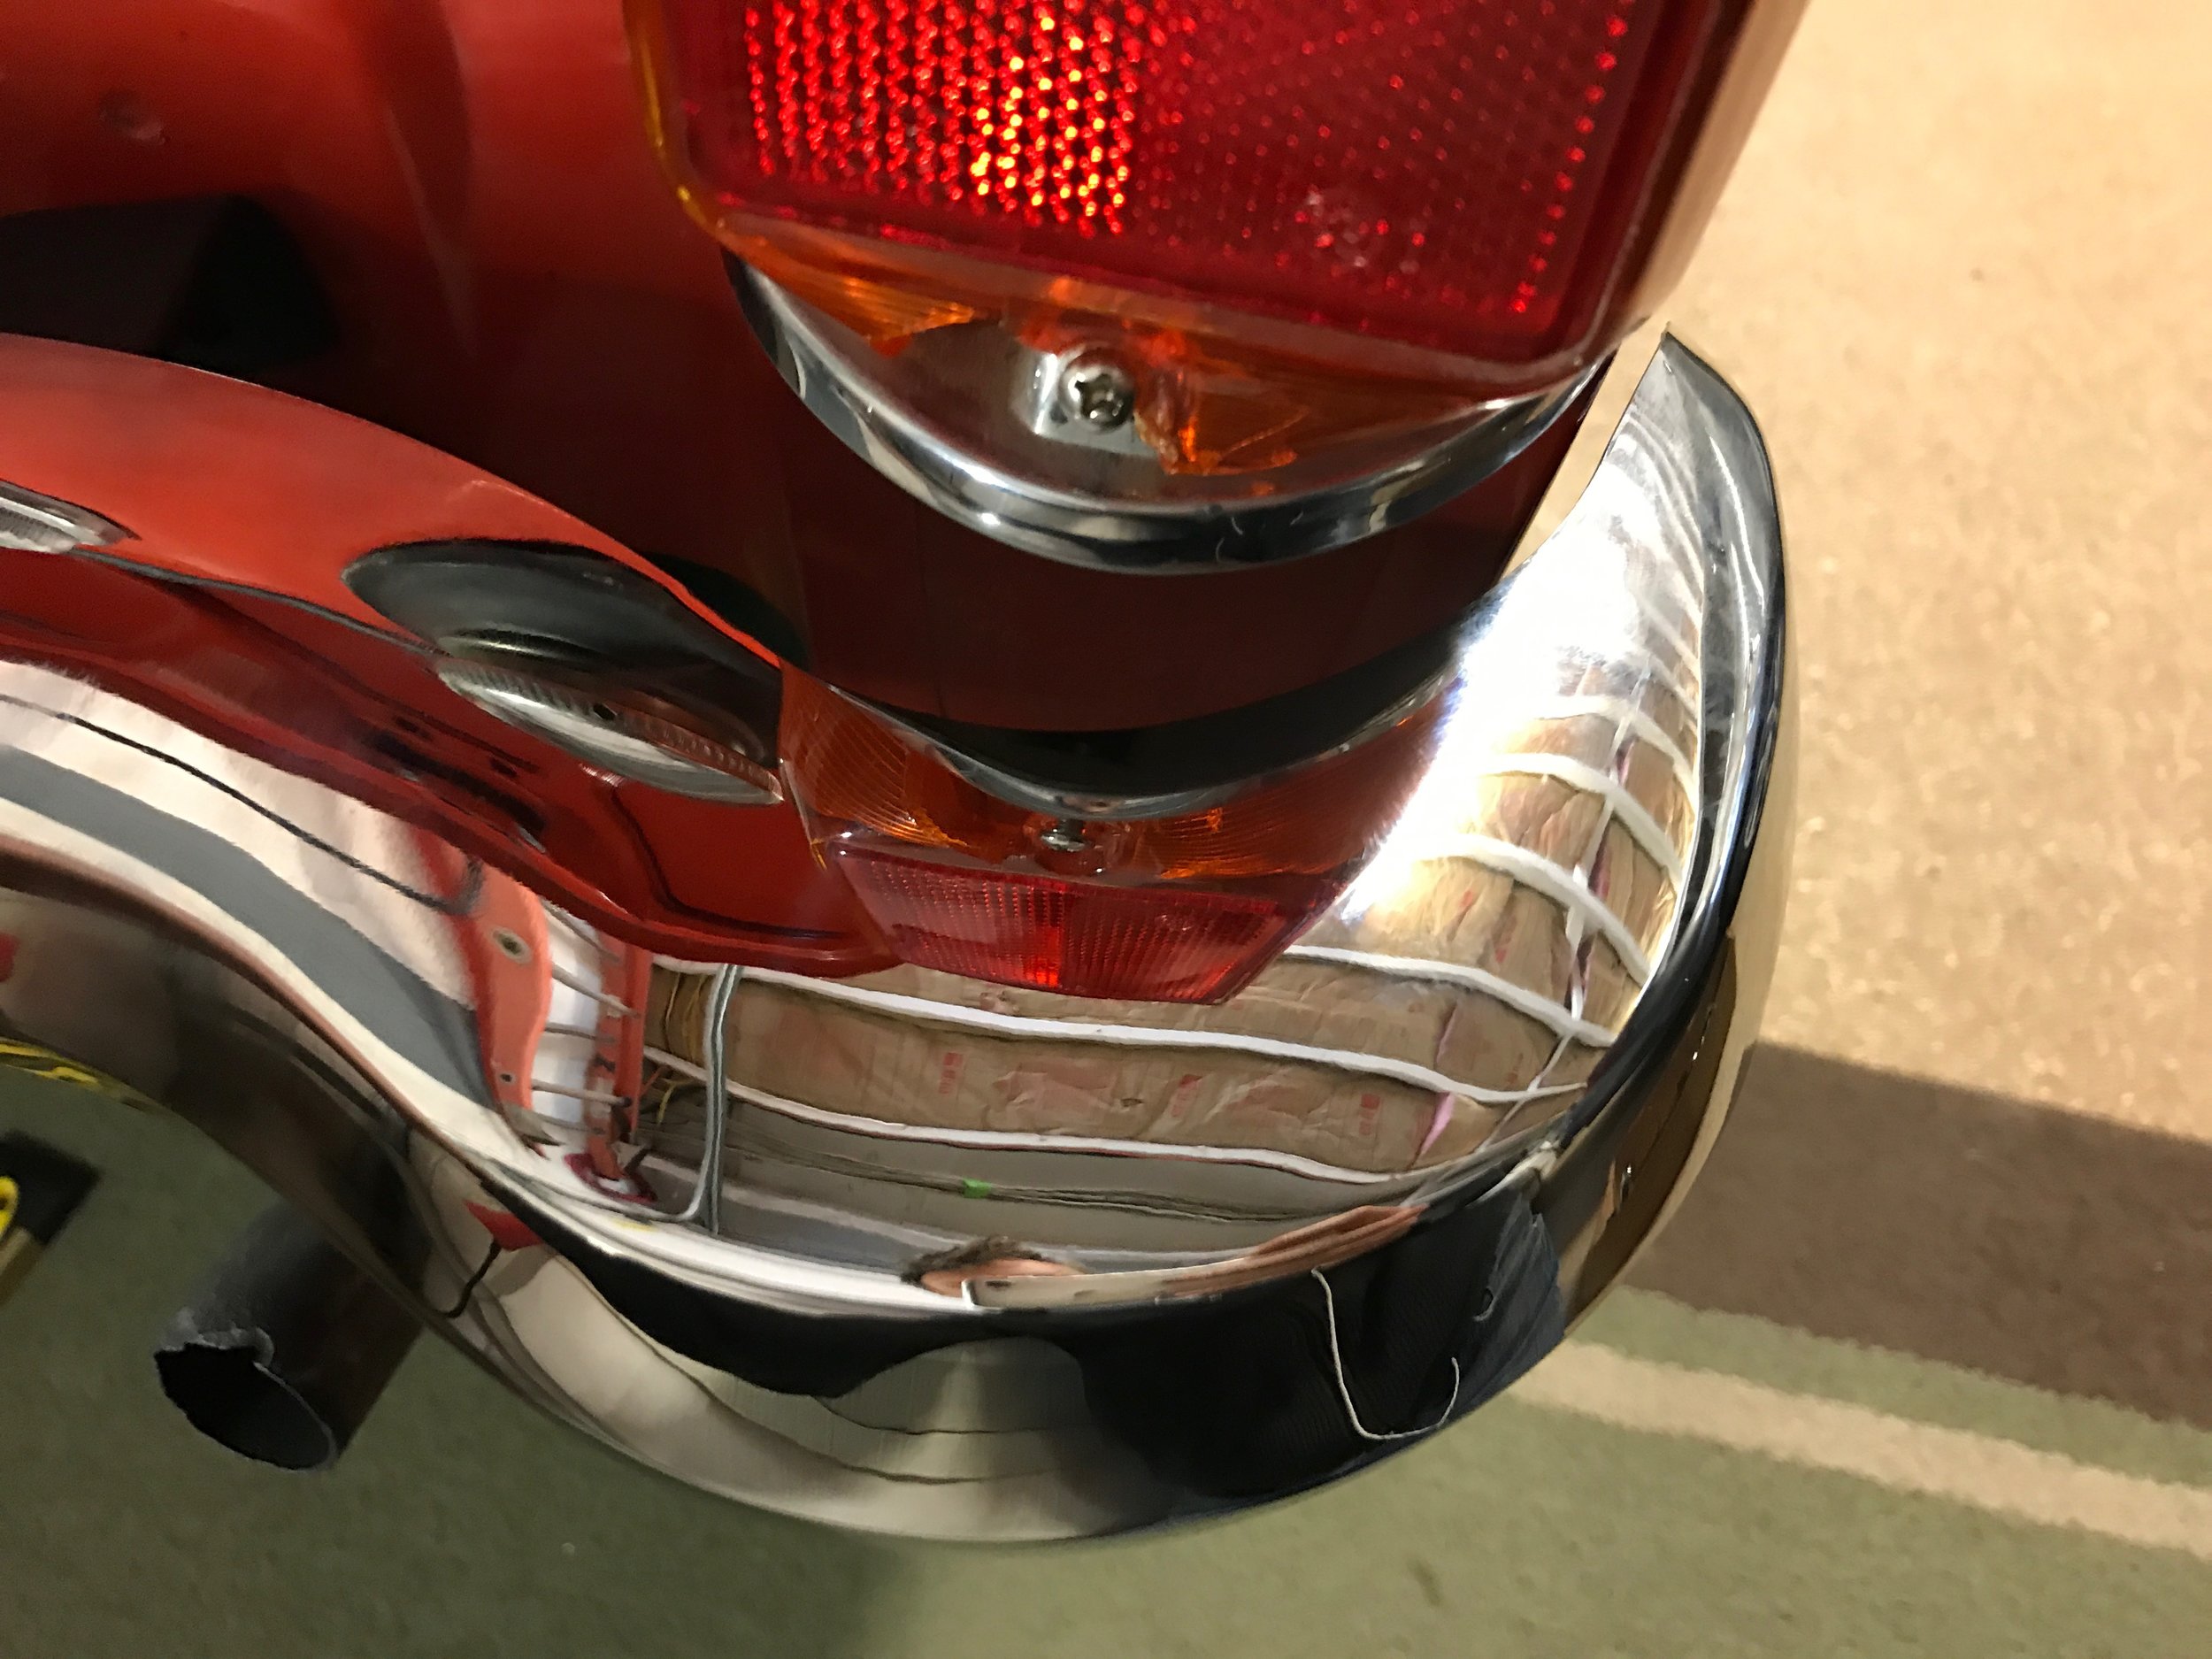
With a slight twist of the bracket - perfecto.

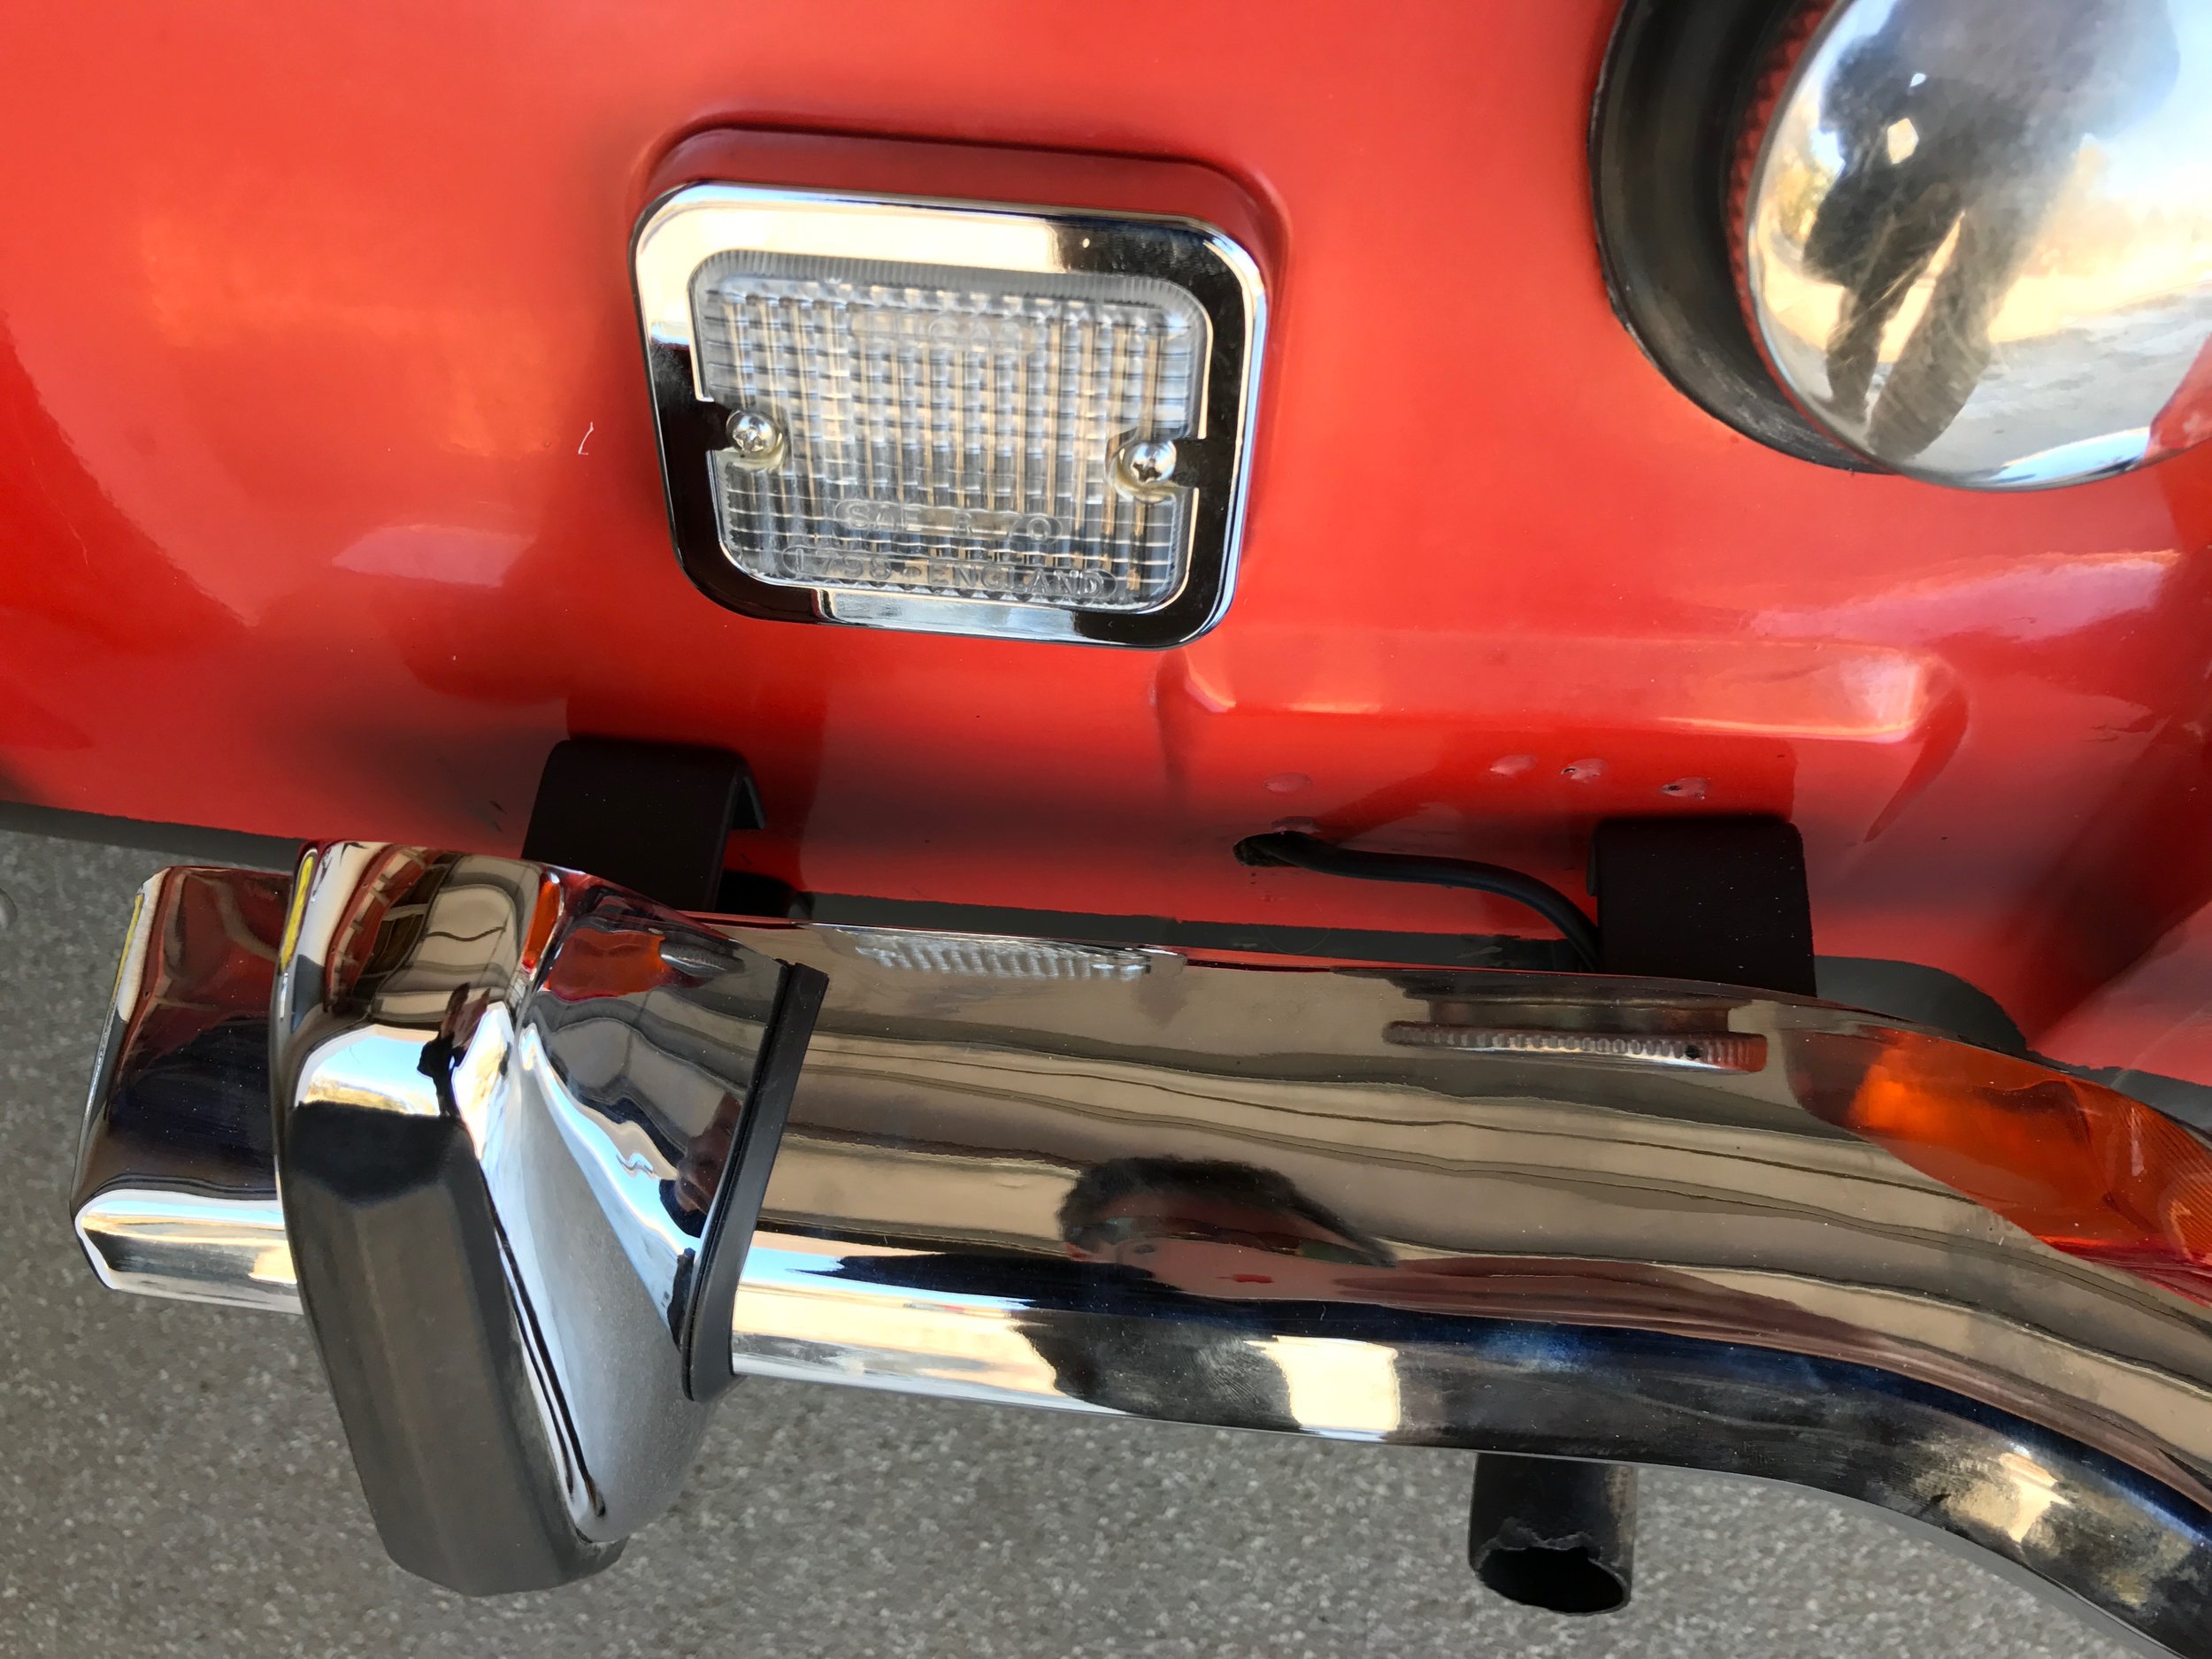
There are two holes left over from the old license lights, for now there are two plastic plugs from the local hardware store filling them. Not my ideal solution but it works pretty well.
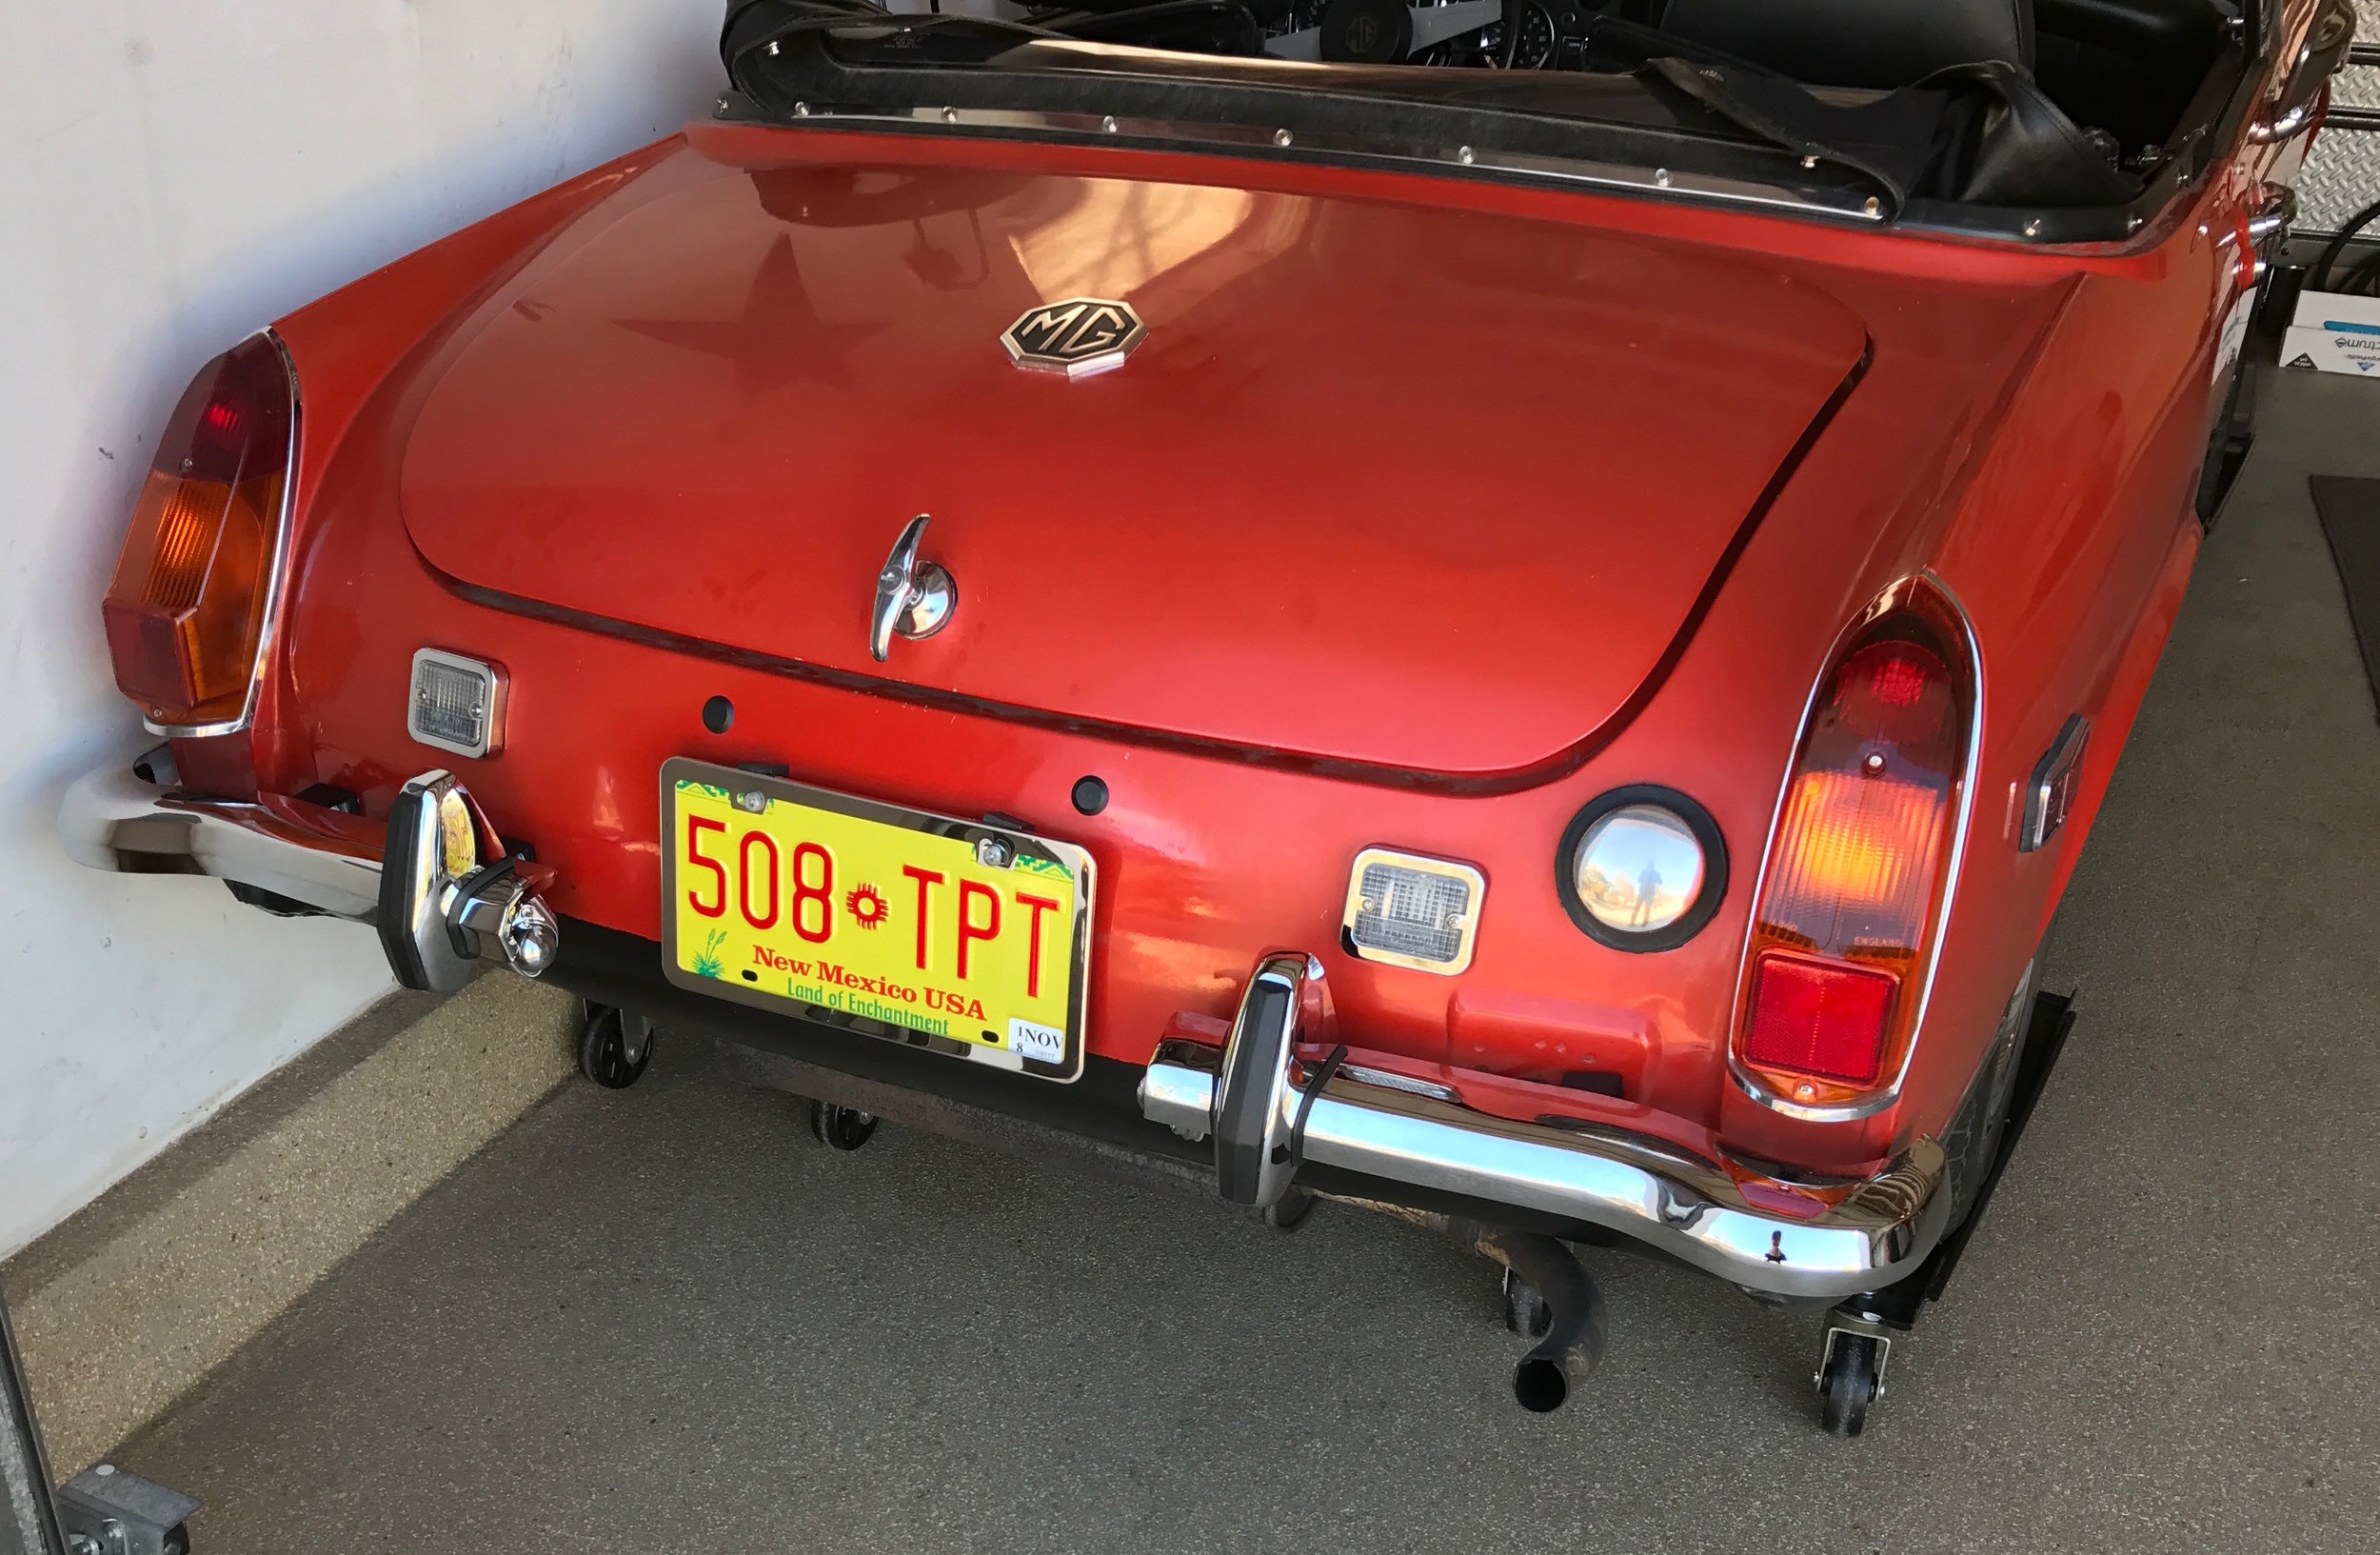
Moss came through with some rear bumper halves that looks pretty good. I just couldn't find the quality I wanted on eBay. Once again one of the mounting points needed a tap to clean up the threads. I cleaned up the brackets and mounting bars from my salvage bumper and also restored and reused the license plate lights. The wires for the lights run out through one of the old bumper mounting holes, they're totally hidden. I lined up the brackets, took a deep breath, and drilled some huge holes in the back of the car. I bolted the inboard brackets right to the rear body panel, to accommodate the slight curve the first washer inside is thick rubber. I think the car will be destroyed if I get rear-ended but that was probably already true before this project.
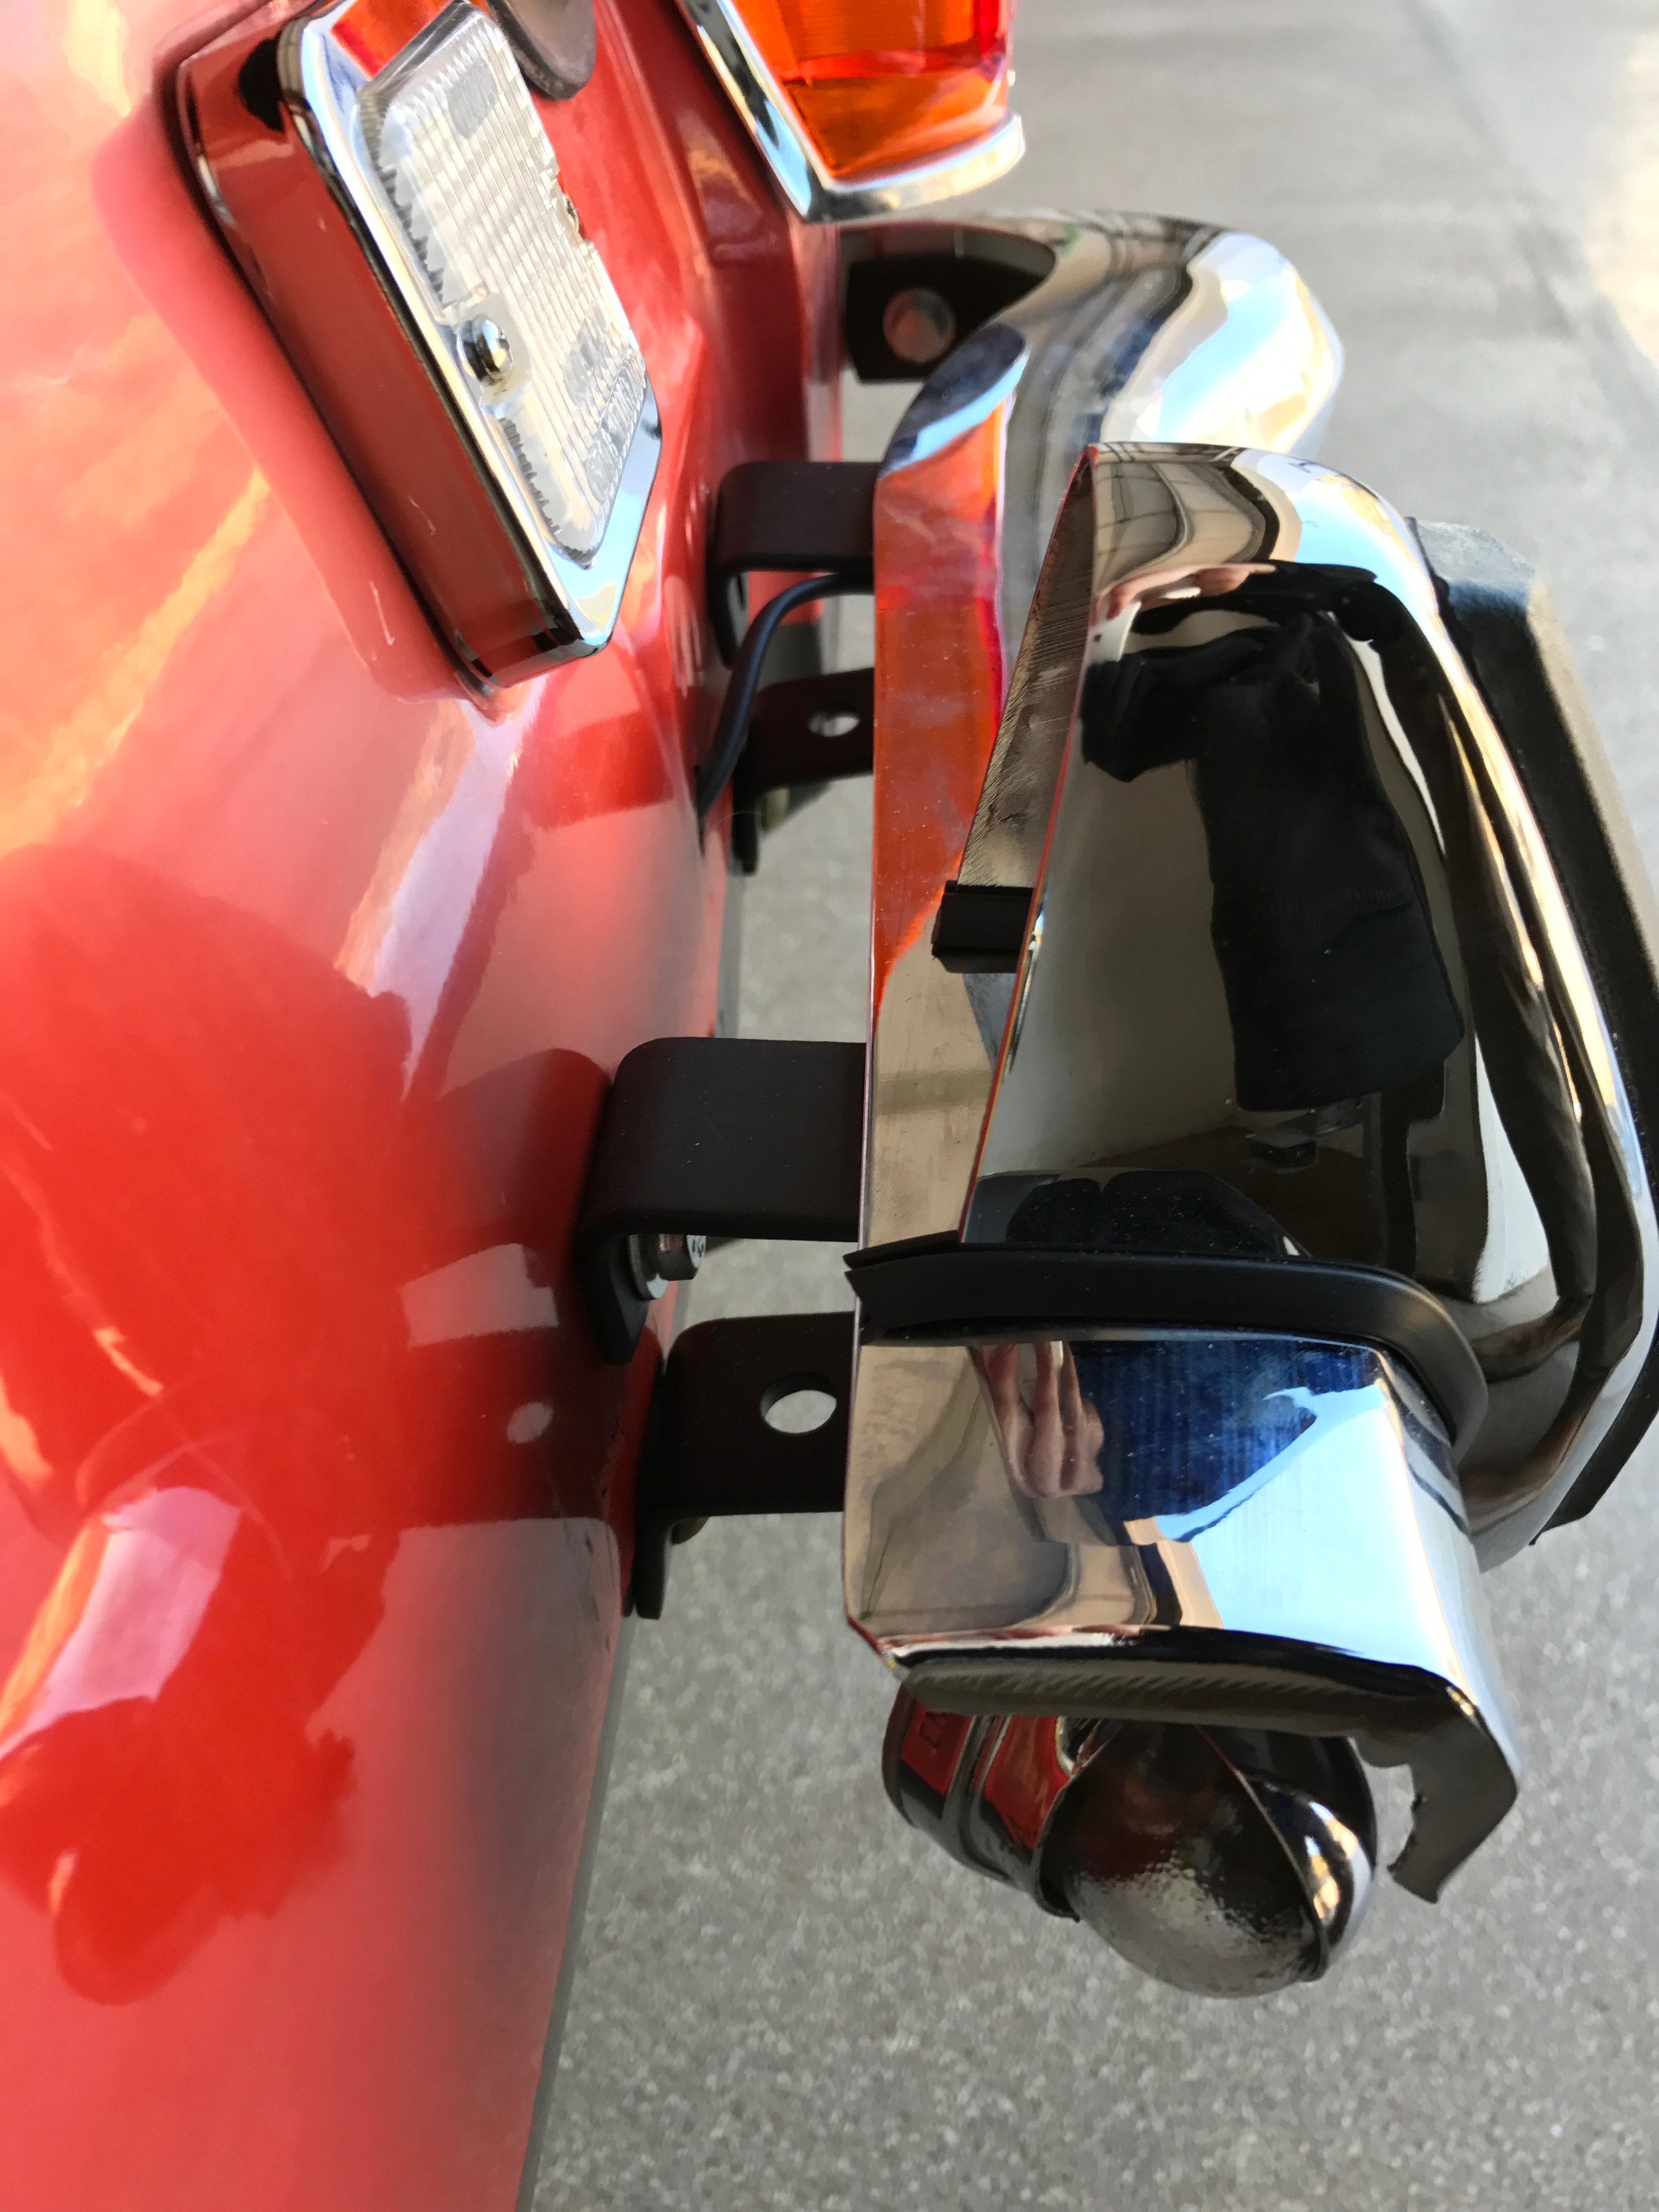
Here you can see no bolt for the outboard top bracket because there's no way to get a nut on the other side. Three seem to be enough. The same isn't true for the left side, the old mounting point is farther from the frame rail and allows all four bolts to be installed.
Here's the final (for now) result! The car is squeezed in the corner of the garage for unrelated winter projects but I think you can see well enough. From any distance you don't notice the missing fillers under the lights and the square mounts for the old bumper aren't too prominent. I'm glad I did it!

Before
And, after!